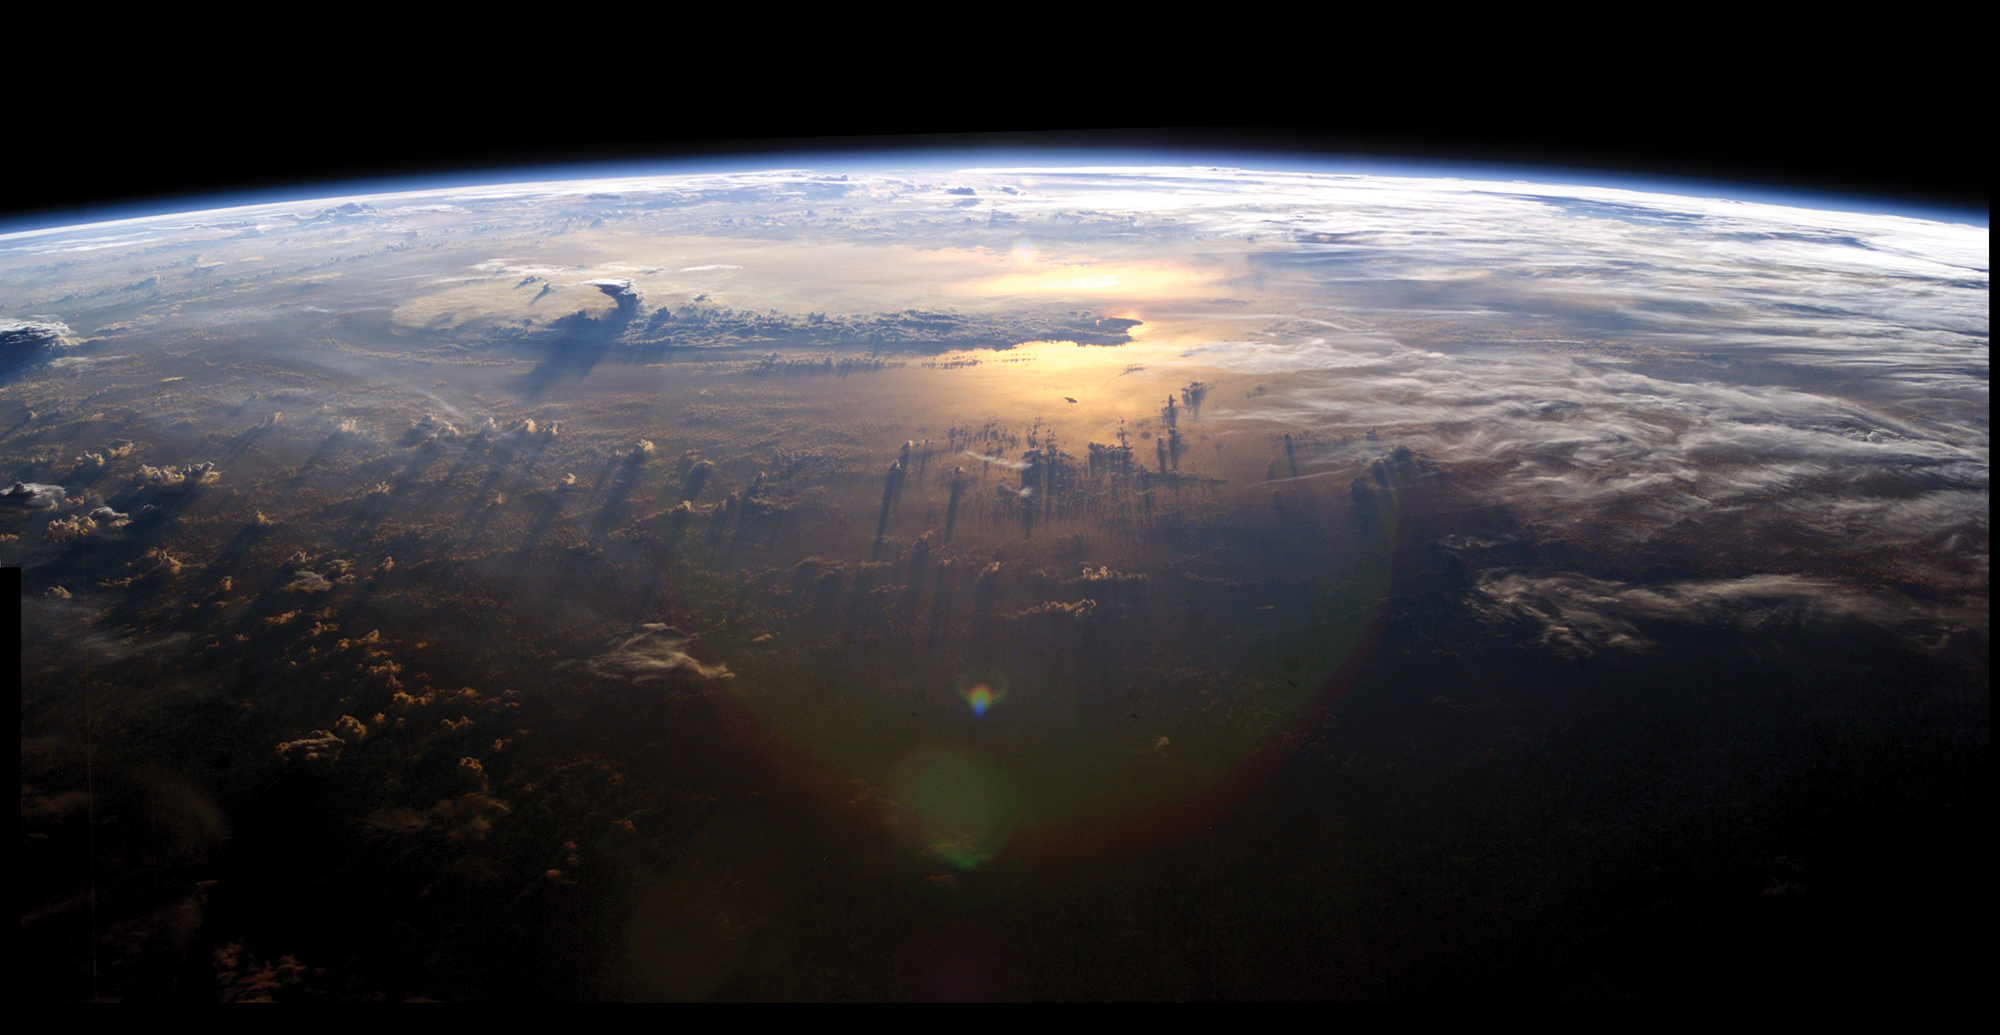
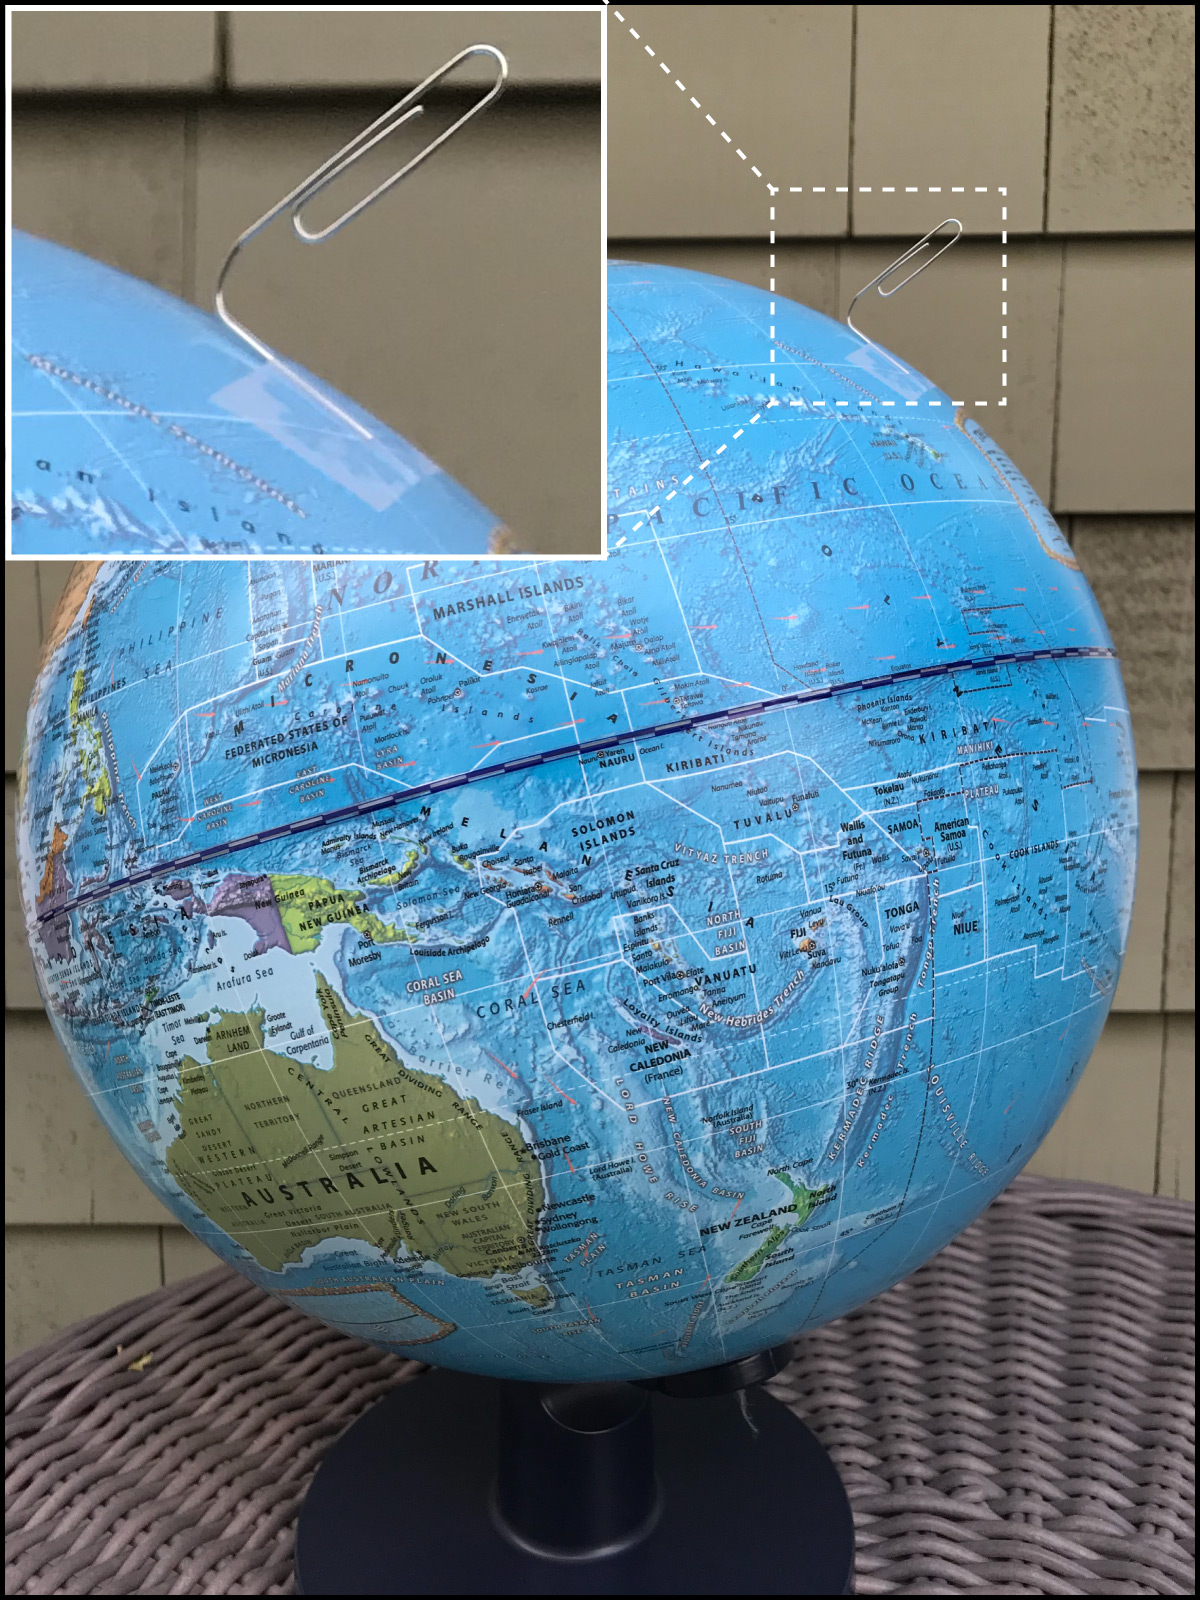
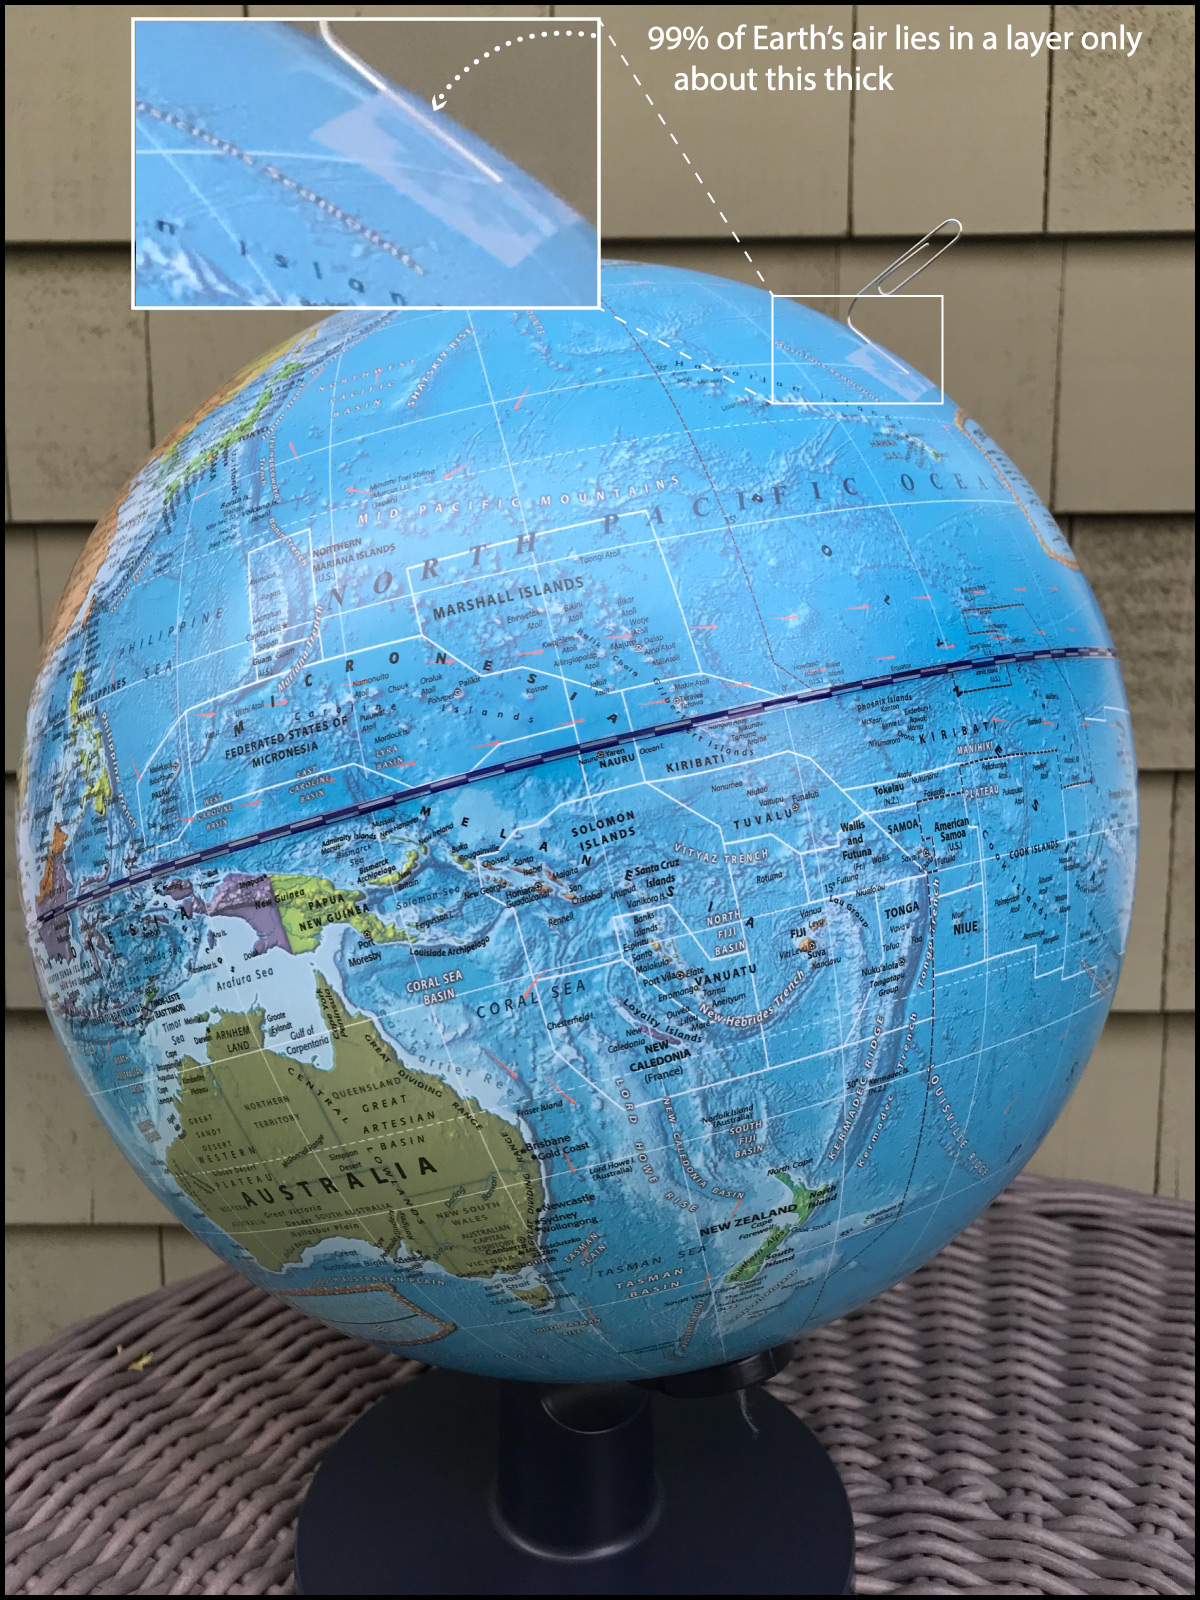
Earth’s atmosphere is the layer of gas that surrounds our planet. As we briefly discussed in Section 4.2.1, the atmosphere is remarkably thin in comparison to Earth as a whole, which is why it appears as a “thin blue line” in photos like that in Figure 6.1–1. In fact, while the outer limits of Earth’s atmosphere are fairly high in altitude, nearly 99% of all the air in our atmosphere lies within about 30 kilometers of the surface. As you’ll see in the following activity, this means that you could represent this air on a standard globe (to scale) with a layer only about as thick as a standard paper clip (Figure 6.1.1–1).
Activity
The Thin Blue Line
In this activity, you’ll verify how thin Earth’s atmosphere is in comparison to the planet as a whole. You may work individually, in pairs, or in small groups.
- Use the fact that nearly 99% of the air in our atmosphere lies within about 30 kilometers of the surface. Look up the diameter of the Earth, in kilometers. About how many times larger is Earth’s diameter than this 30-kilometer high region of the atmosphere?
- Measure the approximate thickness of a standard metal paper clip. Hint: If you find it difficult to measure the thickness of the paper clip wire, try this trick: Make a stack of several paper clips together, measure the total thickness, then divide by the number of paper clip in your stack. For example, if you make a stack of 6 paper clips, then the thickness of a single paper clip is 1/6 of the thickness of your stack.
- A standard globe has a diameter of about 30 centimeters. About how many times larger is the globe diameter than the thickness of the paper clip?
- Based on your calculations, is it true that, to scale, the layer in which nearly 99% of the air lies is like the thickness of a paper clip on a globe? Explain, and discuss whether you think the statement is a reasonable one for giving people a sense of scale.
This is a simple mathematical activity in which students verify the statement made above about the relative thickness of Earth’s atmosphere. They will see that, in fact, the statement is a slight exaggeration, but still a reasonable mental image.
- (1) Earth’s diameter is about 13,000 km, which means it is 13,000 30 ≈ 430 times as “thick” as a 30-km thick layer.
- (2) Student answers for the thickness of the paper clip may vary depending on the paper clips they use, but a typical standard paper clips is less than 1 millimeter thick. Note: If they do the “trick” with stacking, be sure they press the paper clips together so there are no gaps left that would increase the thickness.
- (3) The globe diameter must first be converted to 300 millimeters. Assuming a paper clip thickness of 1 millimeter, then the globe “thickness” is larger by a factor of 300.
- (4) Notice that from question 1, the real Earth is about 430 times as “thick” as the layer of atmosphere (in which nearly 99% of the air lies), while in question 3 we found the globe is about 300 times as “thick” as the paper clip. This is not an exact match, but you should help students realize that it is very close, particularly when just trying to give a sense of scale. Remind them that the statement is vague, since paper clips come in a variety of different standard sizes, and that the statements about the atmosphere (“nearly 99%” within “about 30 kilometers”) are also a bit vague. You should help them recognize the value of comparisons like this in providing a sense of scale and perspective, even if they are not exact.
In this section, we’ll explore basic properties of the atmosphere, focusing on its pressure, composition, and the way in which we define layers with altitude. Before you continue, try the following quiz to review what you’ve already learned about the atmosphere in Chapter 4.
Quiz – Atmosphere Review
Answer the following questions based on what you’ve learned previously about Earth’s atmosphere, particularly in Section 4.2.1 and Section 4.3.1. Feel free to look back at those sections to help you answer the questions.
Note: As always, after you finish the quiz, be sure you read the feedback that explains the correct answers, to make sure you understand the reasons for these answers.
Atmospheric Pressure
We’ve already talked quite a bit about atmospheric pressure, including how it compares between planets. But what exactly is pressure, and how do we measure it for air? Let’s investigate.
Defining Pressure, Air Pressure, and Atmospheric Pressure
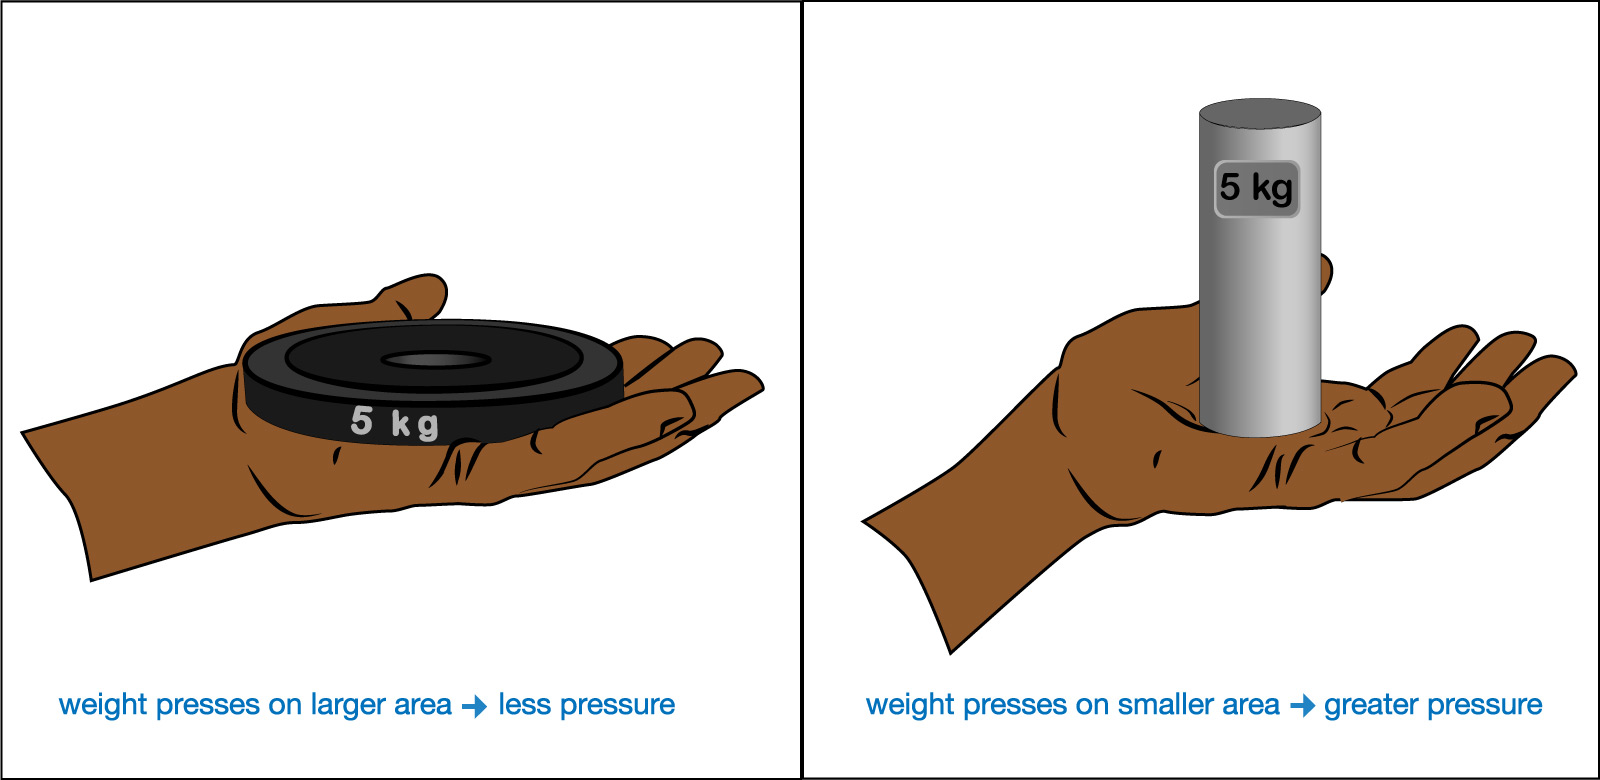
The general scientific definition of pressure is “force per unit area.” You can understand what this means with the simple experiment shown in Figure 6.1.1–2, in which alternately you hold two different objects of the same weight in your hand. Notice that even though both objects shown in the figure have the same weight (5 kg) and therefore push downward with the same total force (due to gravity), the object on the right presses down on a smaller area of your hand than the one on the left. You will easily feel the greater pressure from the object on the right, which results from fact that its force concentrated on a smaller area of your hand.
Connections—Etymology
Pressure in Science and Everyday Life
We talk about pressure a lot both in science and in everyday life. In everyday life, you might hear someone say something like “I’m under a lot of pressure to do well in school.” In science, you might hear someone say “The pressure in the pot became so high that it blew the lid off.” Notice that, in both cases, the meaning of pressure is essentially “how hard something is being pushed.” This makes sense with the word’s etymology, since it comes from a Latin root (pressura) that essentially means “the action of pressing.” You can therefore use the everyday idea of pressure to help you remember the meaning of the scientific idea, as long as you remember that in science pressure is given a more precise definition (as force per unit area).
Discussion
Floating and Other General Pressure Concepts
Discuss the following questions in small groups or as a class.
1. If you’ve learned how to swim, then you probably first learned to float on your back. Explain why it is easier to float on your back than to float upright (vertically) in deep water.
2. Suppose there are two heavy tables of the same weight, but one has thicker legs than the other. Which table has more pressure pressing down on its legs? If you pile more weight on both tables, which one is more likely to have its legs collapse (assuming the legs are made of the same strength of material in both cases)?
3. Explain why vaccine injections are given with a thin needle rather than something thicker.
4. Think of and briefly discuss a few more situations in which the same weight or force can have different effects depending on pressure.
This should be a short discussion to make sure students understand the basic concept of pressure, which most of them should already have learned about when studying physical science.
- (1) Your weight is the same whether you are upright or prone (on your back). However, your weight is pushing on a larger area of water when you are prone, which means a lower pressure for the water to support.
- (2) The thinner legs have a smaller surface area, and distributing the weight over a smaller area means more pressure. This table is therefore also more likely to have its legs collapse due to added weight on the table.
- (3) To get an injection to penetrate the skin requires sufficient force to break the skin. For a given amount of force, the pressure is greater if it is directed at a smaller area, and a thin needle minimizes the area. That is why injections use needles.
- (4) Students will likely come up with many similar situations that will help make sure they understand the relationship between force, area, and pressure.
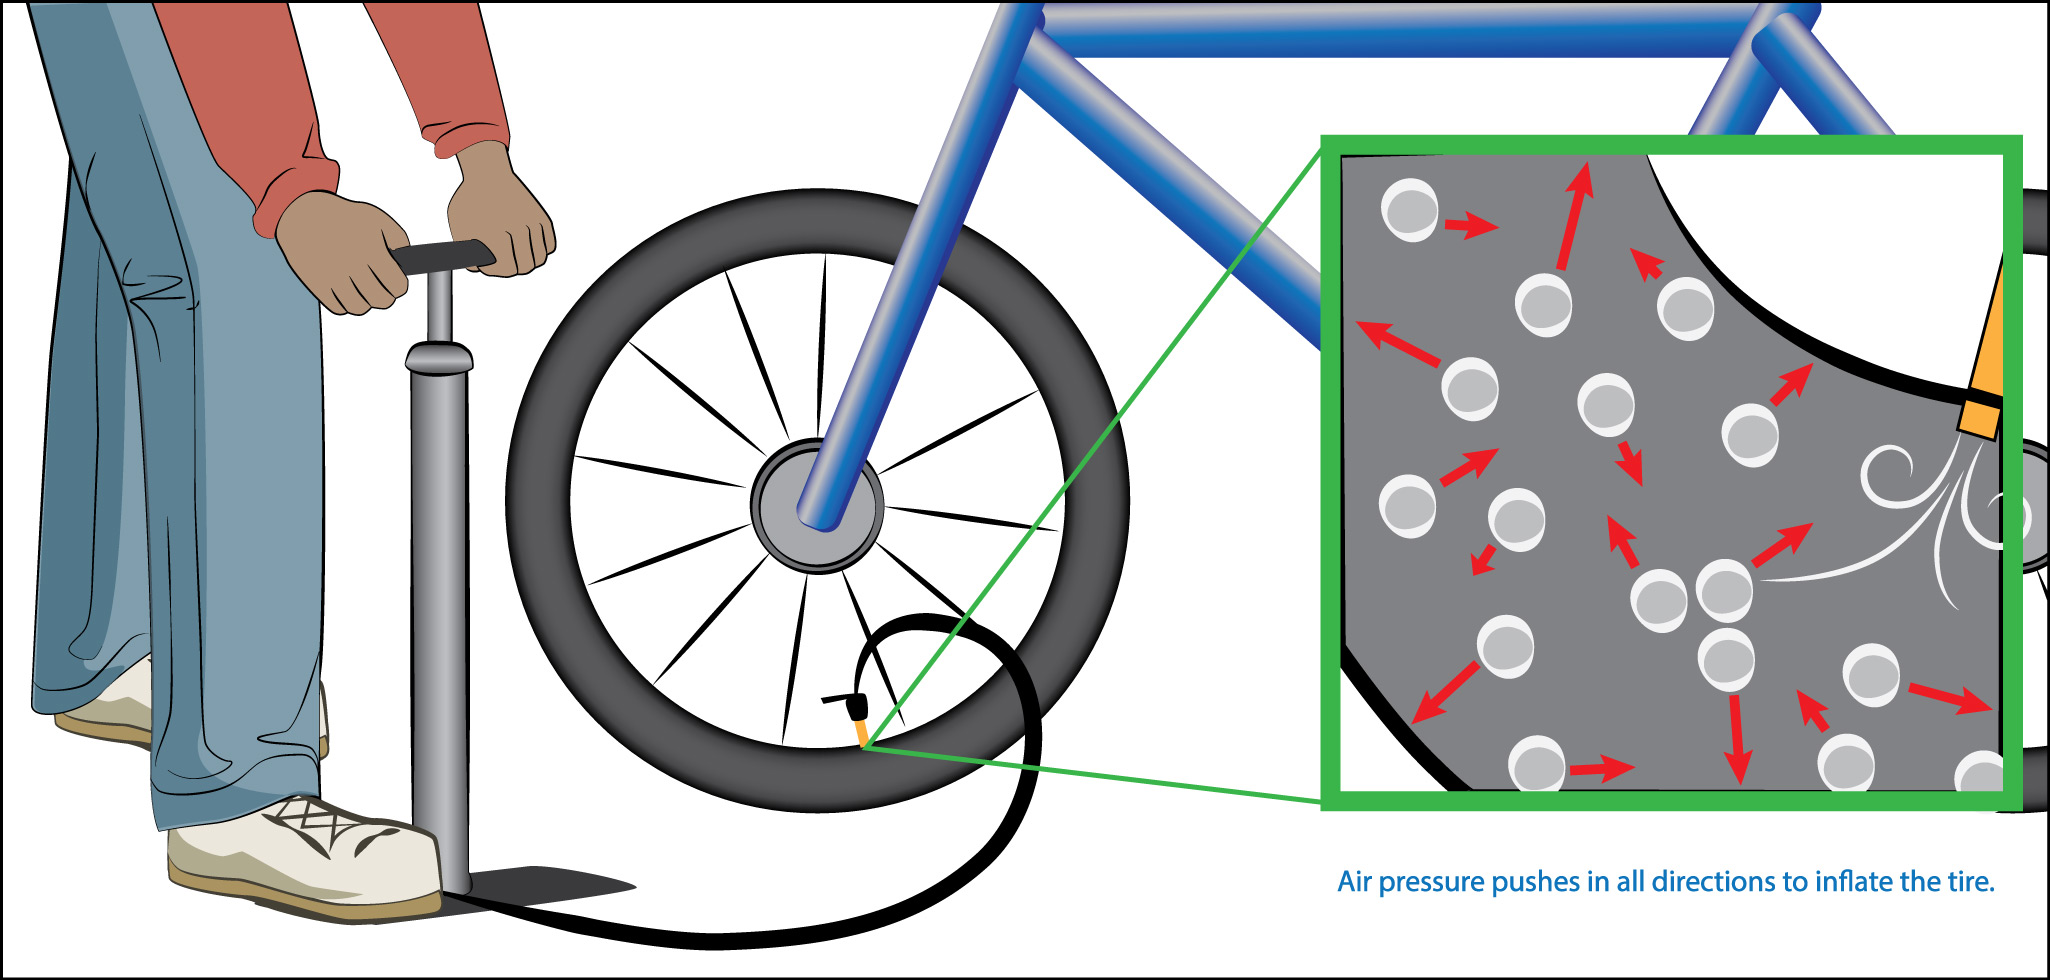
The idea of pressure can also be applied to air, because even though we don’t usually think about it, air also exerts force. The source of this air pressure is the many collisions occurring between molecules in the air with each other and with any surface they come in contact with. The only significant difference between the pressure due to air and the pressure created by the weights in Figure 6.1.1–2 is that while the weights only push downward, air pushes in all directions. That is why, for example, pumping up a tire creates air pressure that inflates the tire by pushing outward in all directions (Figure 6.1.1–3).
The fact that air pushes in all directions means that one of those directions is downward, and this downward push represents the weight of the air. More specifically, atmospheric pressure measures the total weight of the air that sits above any given area. You can understand this idea by thinking of air as sitting above the ground somewhat like a huge stack of pillows (Figure 6.1.1–4). The pillows all push down on each other, but the ones lower down are more compressed — meaning they are subject to greater pressure and have higher density —because there is more total weight above them. In the same way, the fact that air is more compressed near the surface means that the atmospheric pressure and air density is highest at the surface and lower as you go upward.

You can now understand the basic units that we use to measure atmospheric pressure as follows:
- Remember that the units of pressure are always force per unit area.
- Remember that weight is a force — specifically, the force that some mass exerts downward due to gravity.
- Therefore, atmospheric pressure has units of weight per unit area:
in the metric system, the atmospheric pressure on Earth is commonly stated in units of kilograms per square centimeter
in the U.S. system, pressure is usually stated in pounds per square inch.
Note: While the above units are easy to understand, many other units are also used for pressure. We’ll discuss a few of these later.
On Earth, the atmospheric pressure at sea level is approximately 1 kilogram per square centimeter, which is equivalent to about 15 pounds per square inch. This is a substantial amount of pressure, as you can confirm with the next activity.
Activity
The Weight of the Atmosphere Upon You
In this activity, you’ll investigate the weight of the atmosphere above you, and why you don’t feel this substantial weight pressing in on you. For your calculations, use the sea level atmospheric pressure of about 1 kilogram per square centimeter.
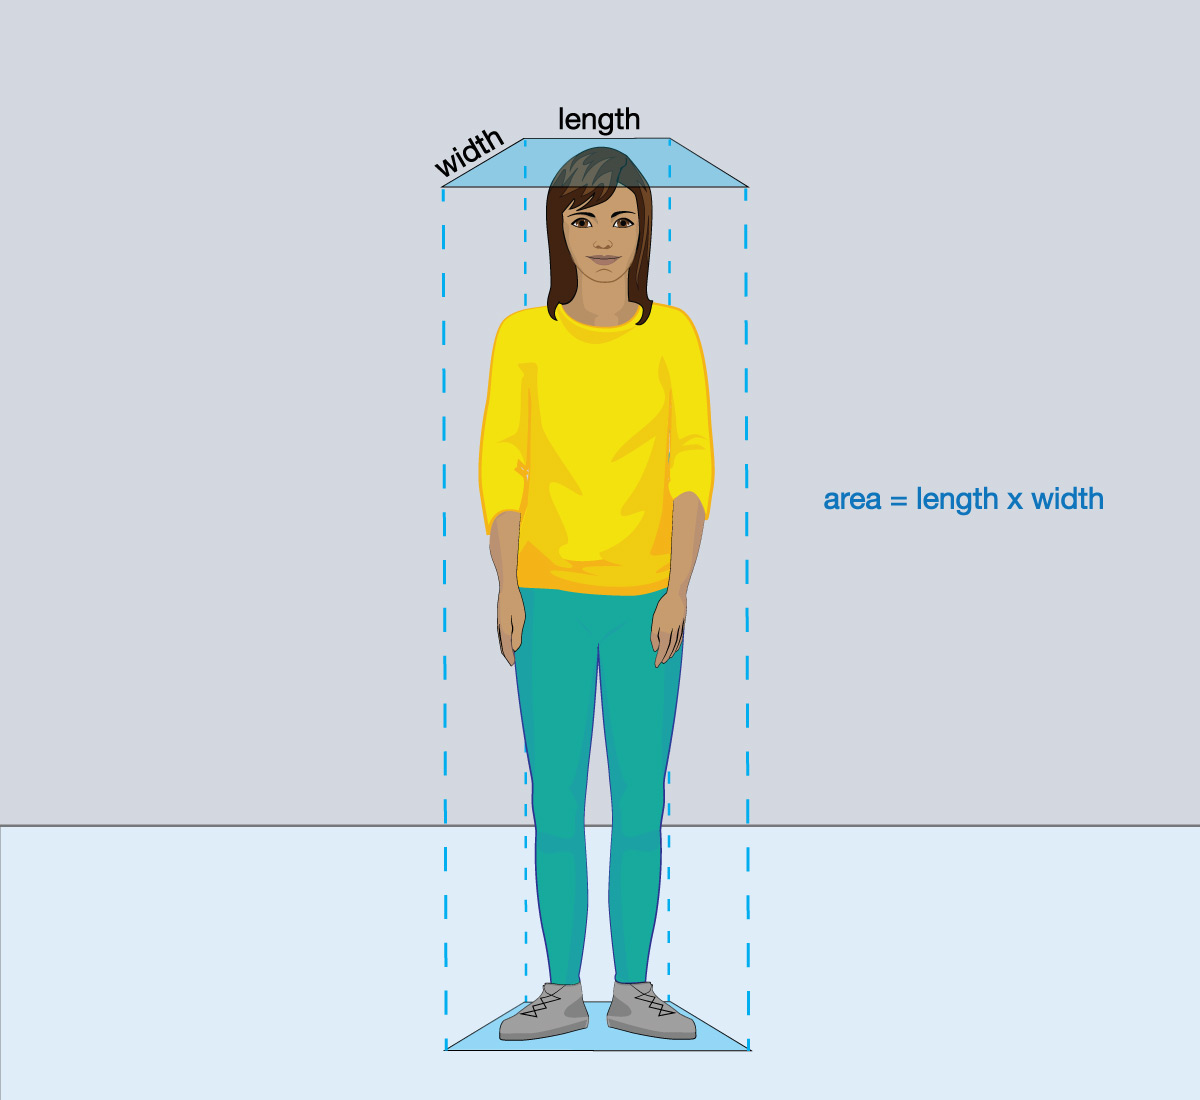
- Pair up with another student. While you stand still, your partner should use a ruler to determine the approximate area, in square centimeters, on which air is pushing down on you. Then switch roles to find your partner’s area. Based on the areas you found, approximately how many kilograms of air are pushing downward on each of you when you are standing? Hint: To measure the area, imagine that your head and shoulders make a rectangle (as shown in the first figure below), and remember that the area of a rectangle is its length × width. Be sure your ruler is marked in centimeters so that you find an area in square centimeters.
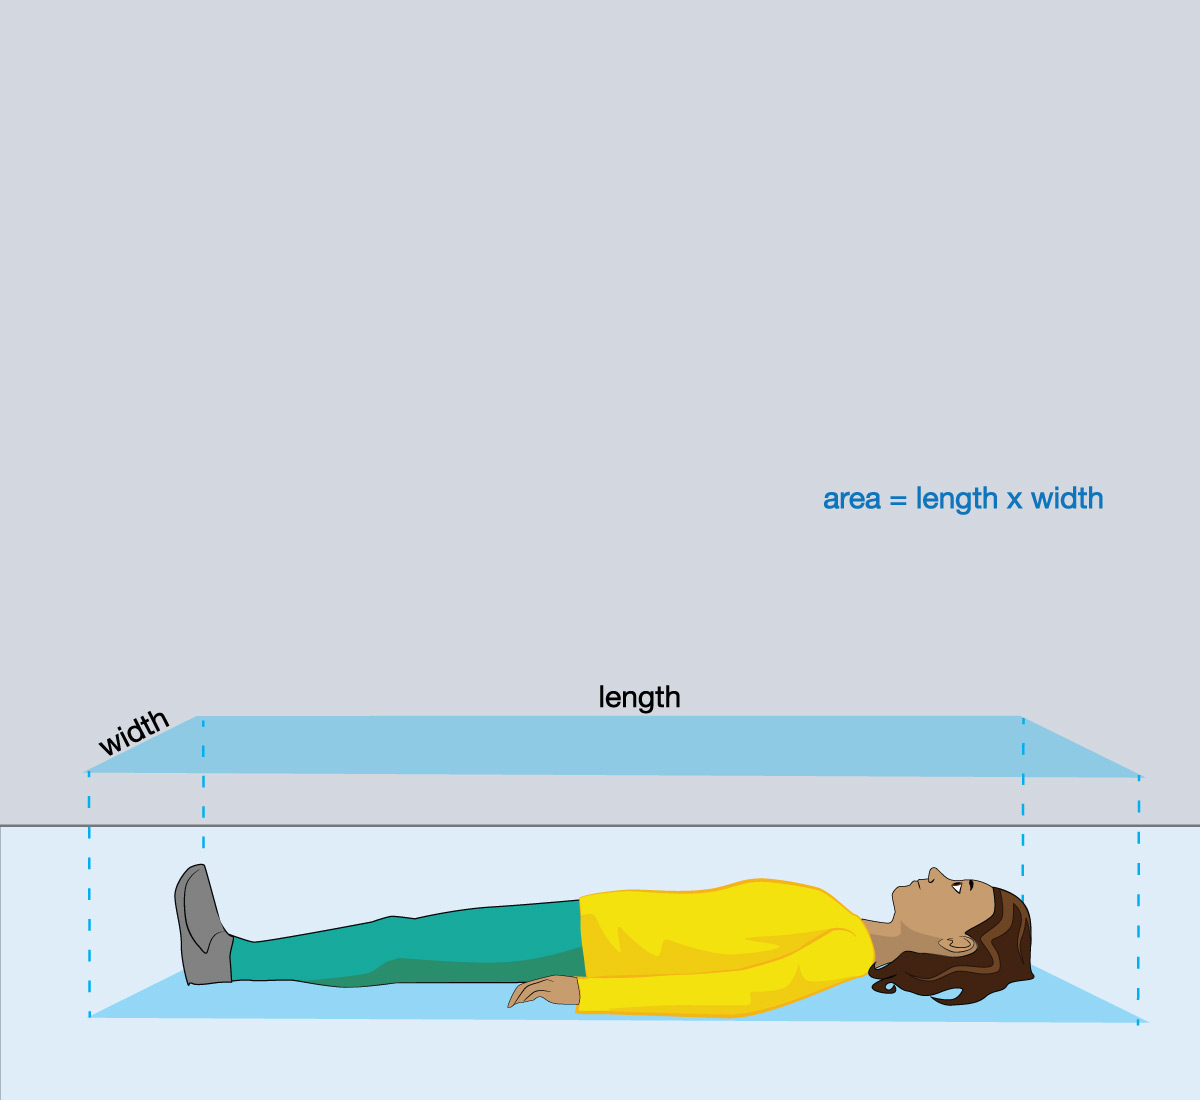
- Follow a similar procedure to find the weight of air pushing down on each of your bodies when you are laying down. Hint: as you did in question 1, find the area (in square centimeters) by assuming your body is a rectangle and measuring its length and width in centimeters, as shown in the second figure.
- Discuss (in small groups or as a class): You have found that the air above you weighs a lot. Can you think of a reason why you don’t feel all this weight pressing down on you? Hint: Think about how air pressure can inflate a tire, as shown in Figure 6.1.1-3.
- Discuss: A related question concerns the fact that air pressure is pushing inward on your body from all directions. Can you think of a reason why you don’t feel this pressure squeezing you?
- Discuss: Use your answers to question 4 to discuss what would happen to an astronaut who removed their spacesuit while in space or on a world with little or no atmospheric pressure, such as the Moon or Mars.
This activity begins with students doing simple estimations of the cross-sectional areas of their bodies in order to calculate the weight of atmosphere that is pressing down on them. This leads to a discussion of why we don’t feel the large air pressure.
- (1) Answers will vary depending on students’ sizes and the approximations they make, but a typical cross-sectional rectangle might be bout 50 cm by 25 cm, for an area of 1,250 cm2. Given an atmospheric pressure of 1 kg/cm2, this means a weight (mass) of 1,250 kg of air pressing down on their shoulders and head. This is quite a lot of weight; for example, it is similar to the weight of a typical car. Note: As discussed in the I was Wondering box above, we will generally ignore the technical distinction between kilograms as unit of mass and their common usage as a unit of weight. You’ll note, however, that we’ve tried to be careful in our wording to avoid saying that they are a “weight,” and if students have questions, it may be worth discussing this topic in more detail.
- (2) Again, answers will vary, but the typical “laying down” rectangle will be 3 to 4 times as large in area as the standing rectangle, so the weight (mass) of the air above will be order of 5,000 kg, or 5 metric tons.
- (3) In terms of why you don’t feel the weight pressing down on you, the simple answer is that air exerts pressure in all directions, which means it is also pushing upward with an equal force. So the downward and upward forces are in balance.
- (4) This question is a bit more subtle than question 3. In this case, we are focused on the fact that because air is pushing inward on you in all directions, you might expect to be able to feel this pressure squeezing you tightly. The reason you don’t is that your body has internal pressure that pushes outward in balance with the external pressure pushing inward. This should make sense biologically: We evolved here on Earth, and therefore our bodies are adapted to the pressure here in on Earth.
- (5) Removing a spacesuit in space or on a low-atmosphere world would mean being outside without the usual external pressure pushing in on you. Since your Earth body still has its own internal pressure pushing outward, this means your body would be out of balance with the outside conditions. In essence, the inside of your body would be pushing out, without the usual outside force pushing back to keep it balanced. Contrary to a common myth, you would NOT explode. However, you would face other physiological consequences that would lead to death within a few minutes. Be sure to note that this would occur even if you removed only a small part of your space suit (such as a glove or helmet), since that would allow all the rest of your air escape.
Activity
Proving that Air Has Weight
How do we know that air has weight? This simple experiment will prove it to you.
Materials:
Meter stick (or yard stick)
2 large balloons
string, tape, pin
Step 1: Inflate both balloons to the same size and tie them off.
Step 2: Tape one balloon to each end of you meter stick.
Step 3: Tie a string to the center of the stick and hang it from a table or other fixture. Adjust the position of the central string as needed until the stick is perfectly balanced (as shown in the figure below).
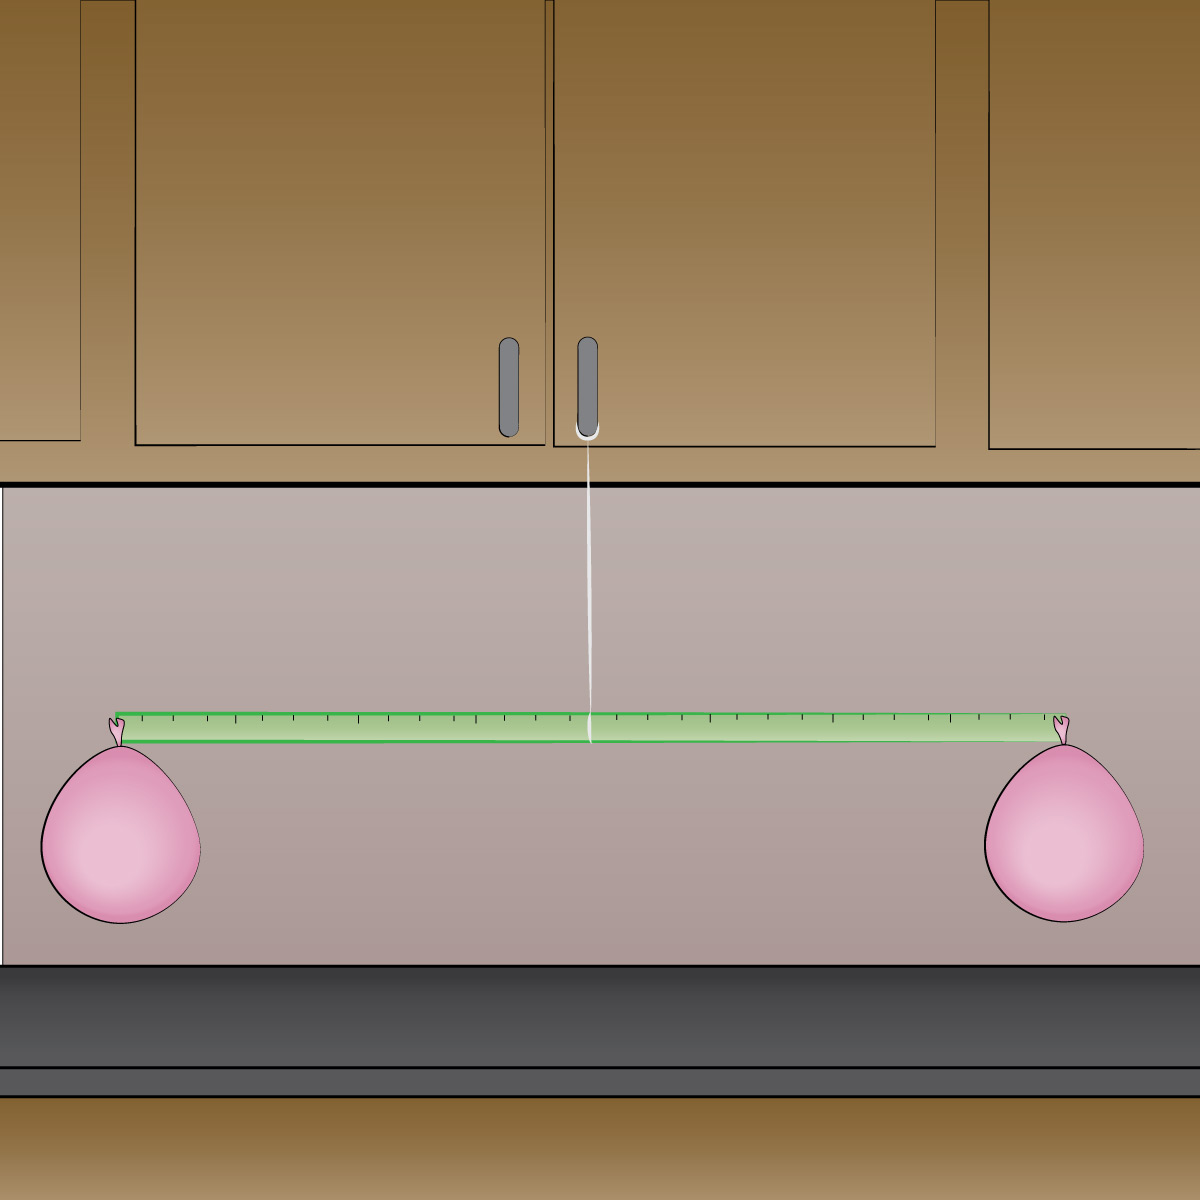
Step 4: Very gently and carefully (so as not to disturb the balance) take the pin and poke a small hole near the neck of one of the balloons, so that its air leaks out slowly. Observe what happens.
Step 5: Discuss how your observations prove that a balloon with air in it weighs more than a balloon without air, thereby proving that air has weight.
This activity, taken with minor changes from this National Weather Service activity, provides a simple experiment to prove that air has weight. Notes:
- The experimental set up should be straightforward. Just make sure that students succeed in getting the initial balance and are able to then deflate one balloon without disturbing the setup.
- For the Step 5 discussion: If all goes well, students will see that the side with the deflated balloon will rise up and the side with the full balloon will sink down, demonstrating that the balloon full of air is heavier than the balloon without air. Since the two balloons were previously in balance, the only viable conclusion is that removing the air from one balloon reduced the weight of that balloon, which proves that air has weight.
Measuring Atmospheric Pressure
The above activity proves that air has weight, but how do we know how much weight it has? A good way to understand the answer is by thinking about drinking with a straw.
It may seem like drinking through a straw means “sucking” the water (or other drink) upward, but if you think about it more deeply, you’ll realize that can’t quite be what’s actually happening. After all, there is nothing directly connecting your mouth to the water, so you couldn’t possibly be pulling the water upward just by moving your mouth. If you’re still not convinced, one simple way to prove this is by “sucking” the water only part way up the straw, then quickly putting a finger over the top of the straw (Figure 6.1.1–5). Try this, then use the questions that follow the figure to think about what you observe.
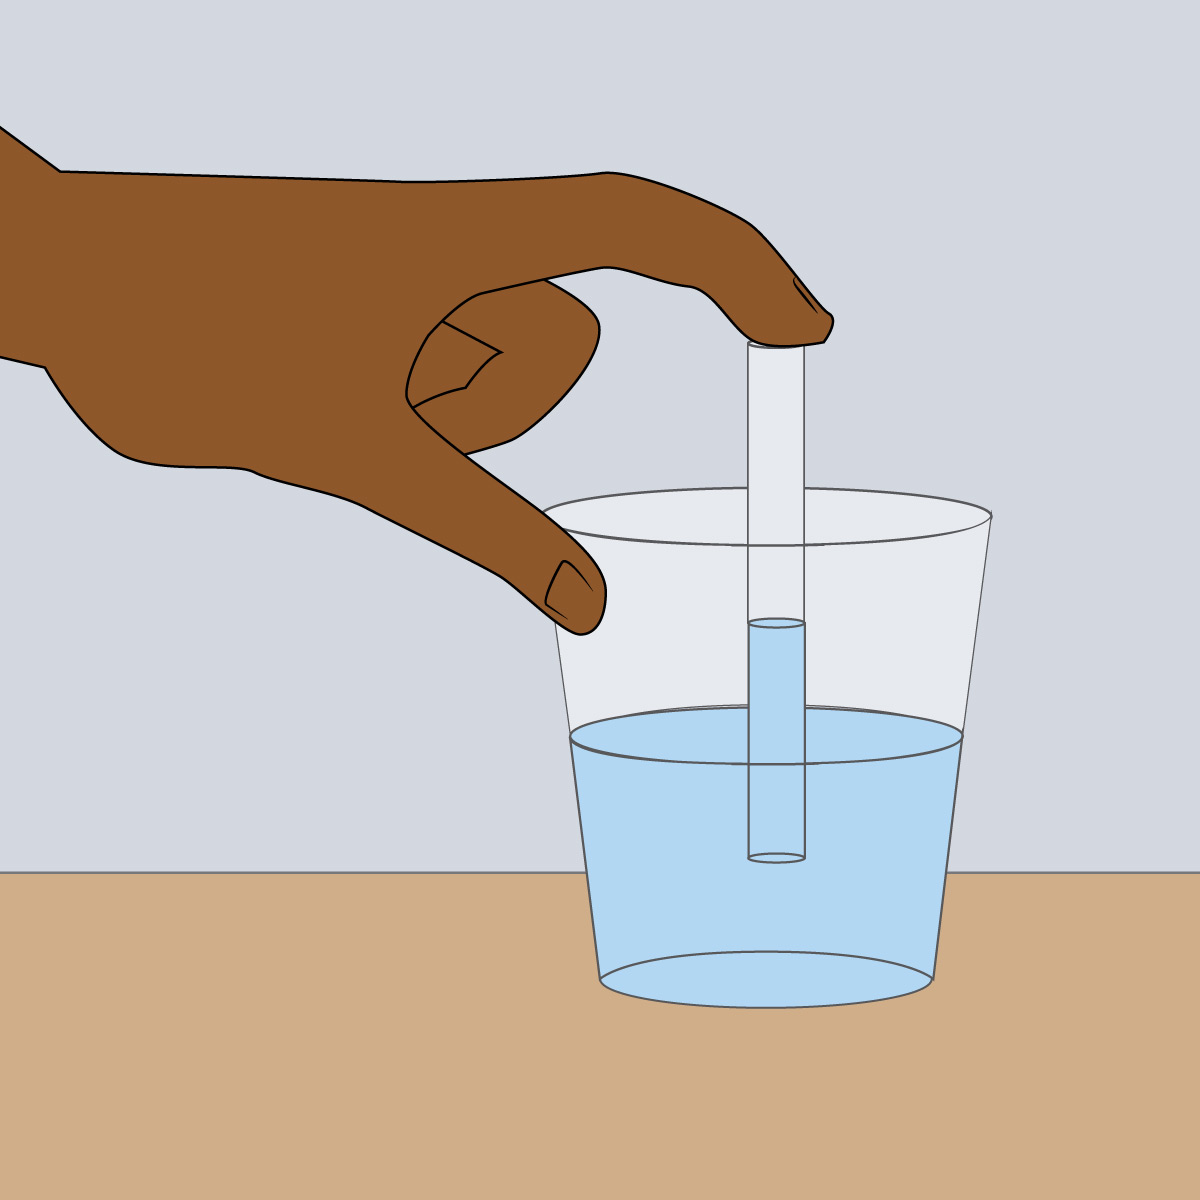
Do the demonstration shown in Figure 6.1.1–5, then discuss the following questions with a classmate. Then click to open the answers to see if they agree with what you came up with.
- What happens to the water in the straw when you stop sucking on it and instead put your finger over the top?
The water remains in the straw at whatever level you “sucked” it up to.
- Think about what happens if you pick up a rock and then let go of it. The rock will fall back down, because you are no longer supporting its weight. Water also has weight. If your mouth was exerting a “sucking force” that picked up the water through the straw, what would happen when you stopped sucking?
Just like letting go of a rock, letting go of the water would cause the water’s own weight to make it fall downward. But that isn’t what happens! So…
- Using your answers to the first two questions, what can you conclude about whether you were actually pulling water upward with your mouth?
You were not pulling the water upward, because if you had been, it would have fallen back when you removed your mouth from the straw.
- Keep holding your finger on the straw, and pull the straw out of the cup. Notice that the water stays in the straw as you lift it out. Explain how this proves that it is the push of air pressure that is keeping the water in the straw.
The fact that the water stays in the straw as you lift it out of the cup means that something must be preventing the water from falling out of the straw. Because the straw is no longer in the cup and there’s nothing else around, the air is only thing that could possibly be preventing the water from falling. That is, air pressure must be pushing upward on the water to keep it in the straw.
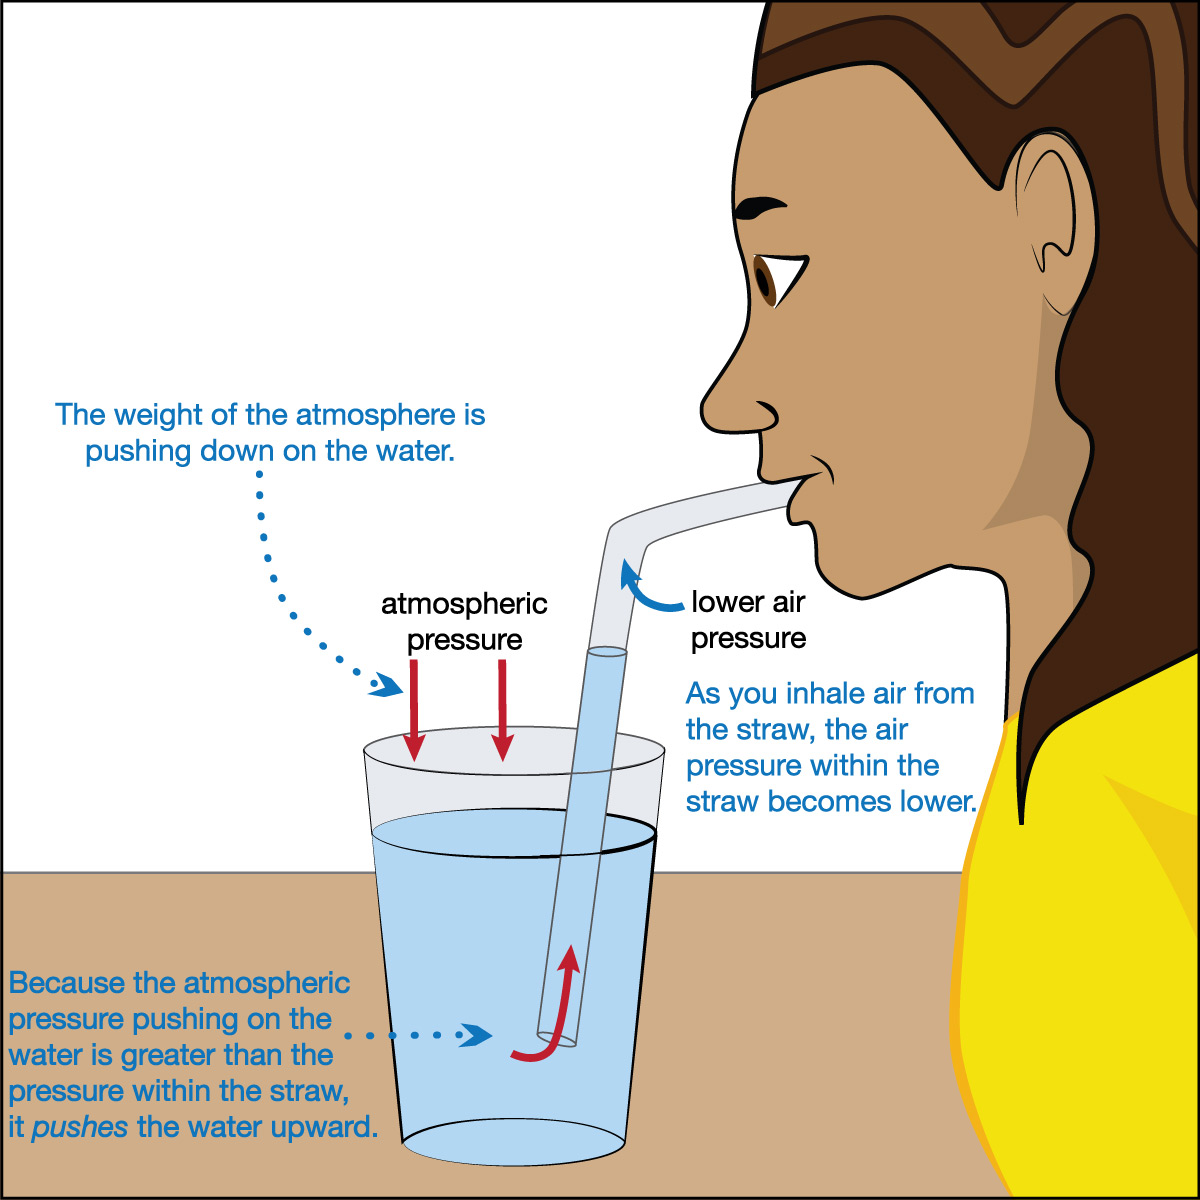
Figure 6.1.1–6 summarizes what really happens when you drink through the straw. Notice that, rather than “sucking” the water upward, the following processes are occurring:
- What you think of as “sucking” is really inhalation in which you expand your body’s airway so that air from the top of the straw enters your mouth and lungs.
- This reduces the air pressure at the top of the straw, making it lower than the air pressure that is pushing on the water surface.
- As a result, the downward push of air pressure on the water’s surface in the cup forces the water upward into the straw.
In fact, this same idea also applies to vacuum cleaners, suction cups, and much more: What we usually call “sucking” or “suction” doesn’t really exist as a force. Instead, “suction” is simply the action of mismatched air pressures.
Activity
More Proof that You Don’t “Suck” Water Upward with a Straw
Try one or both of the following simple experiments, then discuss how they prove that you don’t “suck” water upward when you drink through a straw. More specifically, explain how each experiment demonstrates that what we usually think of as “sucking” is actually “pushing” by air pressure (as shown in Figure 6.1.1-6).
Experiment 1: Two straws. Put two straws in your mouth, with one sticking into a glass of water and the other left open to the air. Then try to drink. What happens, and why?
Experiment 2: Sealed lid. Find a cup that has a tightly sealed lid with a built-in straw, OR you can make your own by finding a jar with a tight fitting lid and poking a hole in the lid that is just large enough to fit a straw into. Fill the cup or jar to the very top with water, insert your straw, and use clay (or something similar – chewing gum can work) to seal the straw so that no air can enter (except through the straw). Then try to drink water through the straw. What happens, and why?
These simple activities may surprise students who have never tried them before. In both cases, students should find that the straws no longer work to drink through.
- Experiment 1: The second straw (open to the air) draws in air that is at atmospheric pressure, preventing the first straw (in the water) from getting the lower pressure needed at its top to create a pressure imbalance. That is why you cannot drink in this way.
Note: You might also ask students to see if they can find a “trick” that will make the drinking straw still work, such as using their tongue to “cap” the second straw or putting a finger over the end of the second straw. These tricks work because they block the outside air from coming in, allowing you to create the pressure difference. - Experiment 2: The set-up is a little more difficult, since the seal needs to be perfect to prevent outside air from getting into the cup. But as long as they’ve successfully sealed off the cup from the surrounding air, students will find that they cannot drink more than a tiny bit of water out through the straw, no matter how hard they suck on it. The reason is that when they begin the drink, they remove a bit of liquid from the jar, so that there is now a bit of low-pressure air at the top of the jar. The tight seal prevents the outside air from entering, which means that in this case, we don’t have the normal atmospheric pressure pushing on the water surface. Without that push, the water will not rise up through the straw.
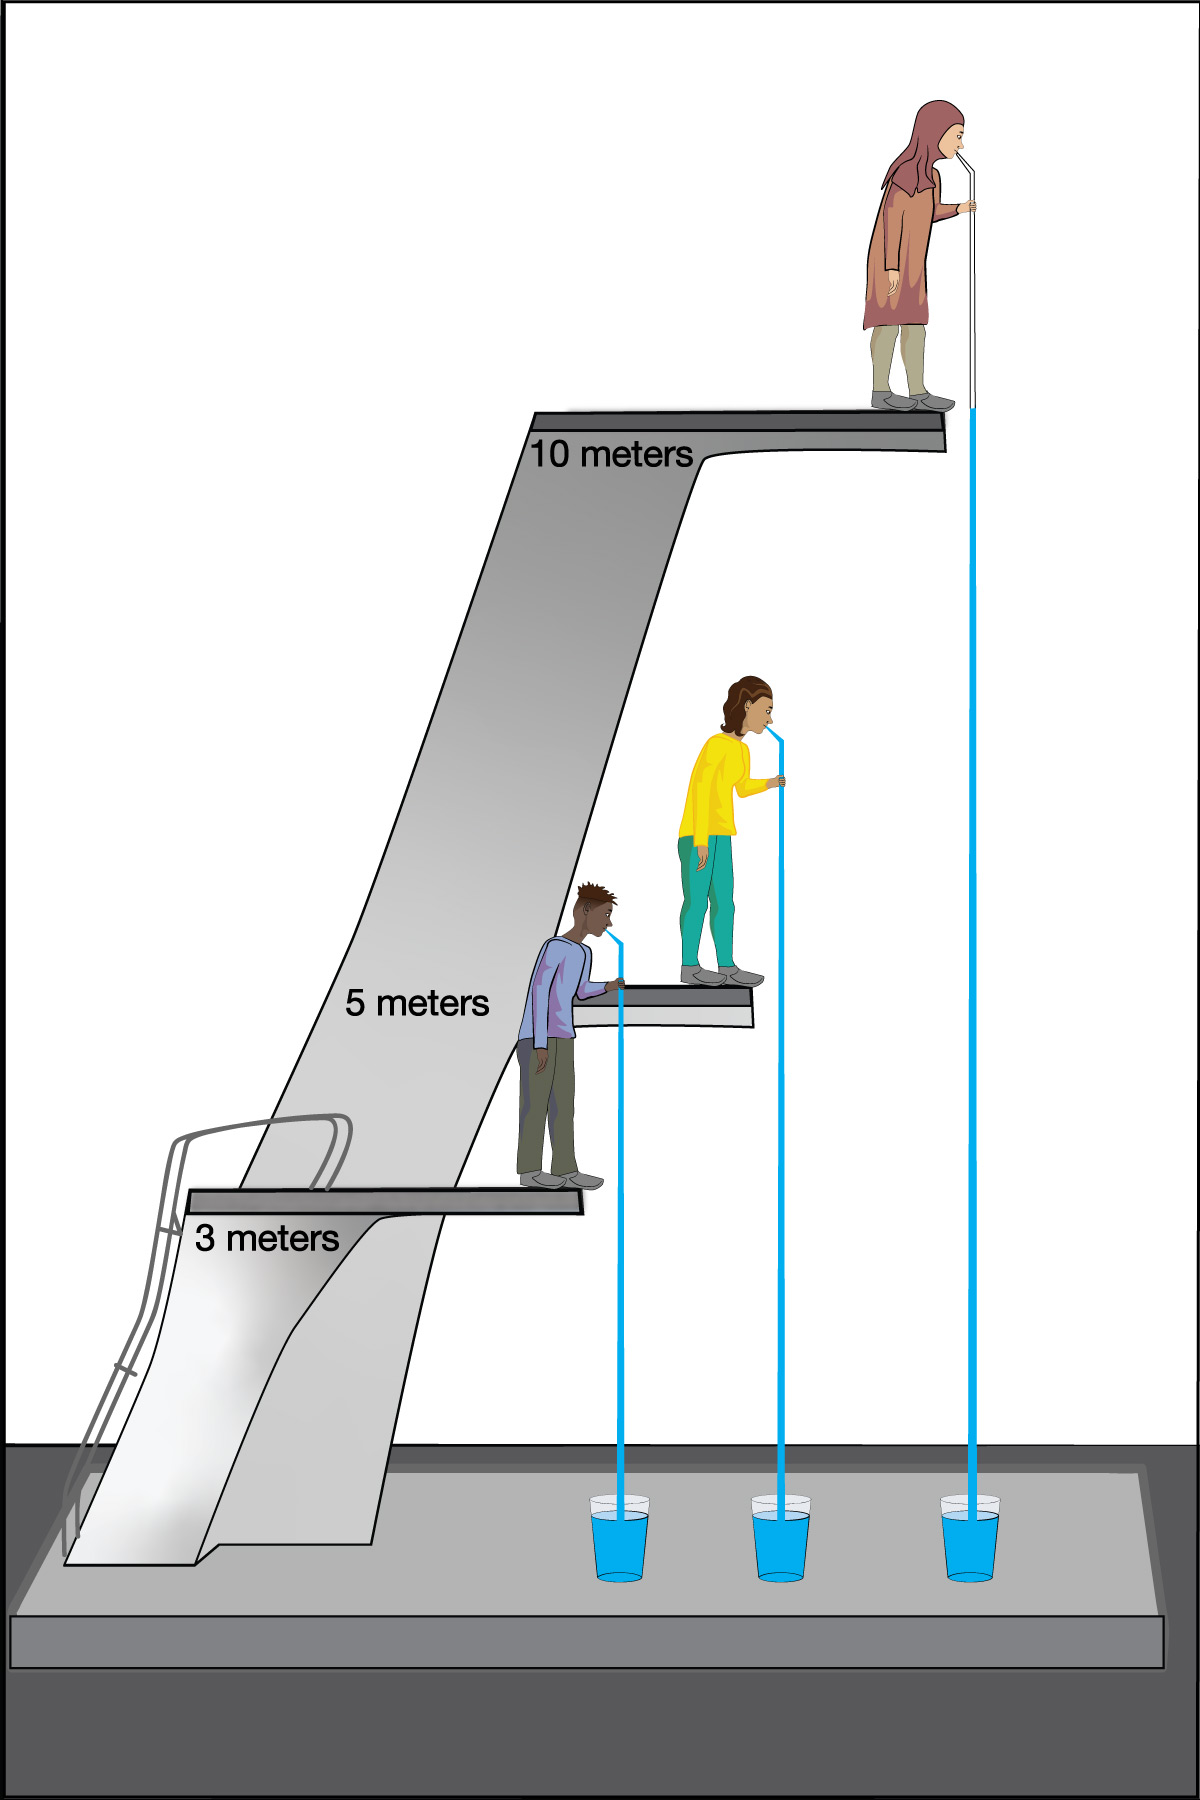
We can use this idea to measure the atmospheric pressure. Imagine making really long straws, so that you could try to drink through them while standing on platforms at different heights. Further imagine that you had superhuman lung strength, so that you could “suck” through the straws with super power (by expanding your lungs so much that air continues to flow into them). If you did this while standing on platforms at heights of, say, 3 meters or 5 meters, you’d have no problem drinking through the straw. But if you tried to do it from above about 10 meters (33 feet), you would find it impossible to drink through the straw, even with your superhuman lung strength (Figure 6.1.1–7).
The fact that you cannot “suck” water upward more than about 10 meters was actually discovered in ancient times, though obviously not with long straws and superhuman lungs. Instead, people trying to pump water from wells or into buildings found that no matter how good of a pump they made, they could never get water to rise more than about 10 meters . This fact also tells us Earth’s atmospheric pressure! Slide Show 6.1.1–8 shows how.
 Slide 1 - If you place an open tube part-way into a large vat of water, the atmospheric pressure pushing on the water will be the same both inside and outside the tube, so the water level will also be the same. Note: You can see this idea in action by placing an open straw into a glass of water. The water level in the straw will be the same as in the rest of the glass.


Slide Show 6.1.1-8 – Study these slides and captions carefully to make sure you understand how the water level in giant straw can tell us the atmospheric pressure.Credit: Zofostro Science.
Be sure you’ve studied the slide show carefully, so that you understand its concluding point:
At sea level, Earth’s atmospheric pressure is the same as the pressure created by the weight of the water in an approximately 10-meter tall column.
How much pressure is that? As shown in the Do the Math below, it is about 1 kilogram per square centimeter, just as we stated earlier. But now you know how this fact is measured.
Discussion
Explaining the Upside-Down Water Cup
Get a glass of water (it can be just partially full) and place a stiff paper card over it. Then hold the card tight on the top of the glass while you carefully turn the entire glass upside down. If you do it carefully, you will find that the paper card stays in place, seeming to magically hold the water in the glass (figure below). In small groups or as class, discuss why the card is able to hold the water in the cup. Hint: It will help to think about what you’ve just learned about how we can use water to measure atmospheric pressure.
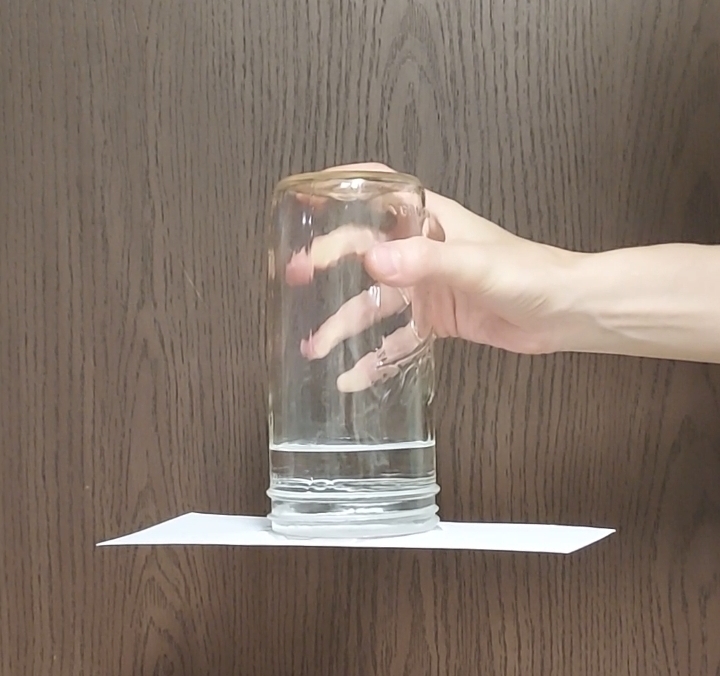
The upside-down glass of water is a simple demonstration that students have probably seen before, but probably never realized why it happens. Use this discussion to help students think through the various ideas we’ve discussed above with the giant straw and the vat of water. The basic answer is this:
- As found above, it takes a column of water 10 meters tall to have a weight that creates a pressure equal to atmospheric pressure (at sea level).
- The depth of water in the cup is much less than 10 meters, which means the pressure created by the weight of the water is much less than atmospheric pressure.
- Because air pressure pushes in all directions, including upward, the atmospheric pressure is pushing the card upward against the glass much more strongly than the weight of the water is pushing down. That is why it stays in place.
Barometers
These ideas suggest a way of making a simple device, called a barometer , for measuring atmospheric pressure at any time and in any place. In principle, all you’d need to do is make an instrument with a long tube in a large vat of water, just like the ones shown in Slide show 6.1.1-8. By creating a vacuum at the top of the tube, the air pressure would push the water up as high as possible. Of course, since this height is about 10 meters at sea level, such an instrument would be very difficult to carry around!
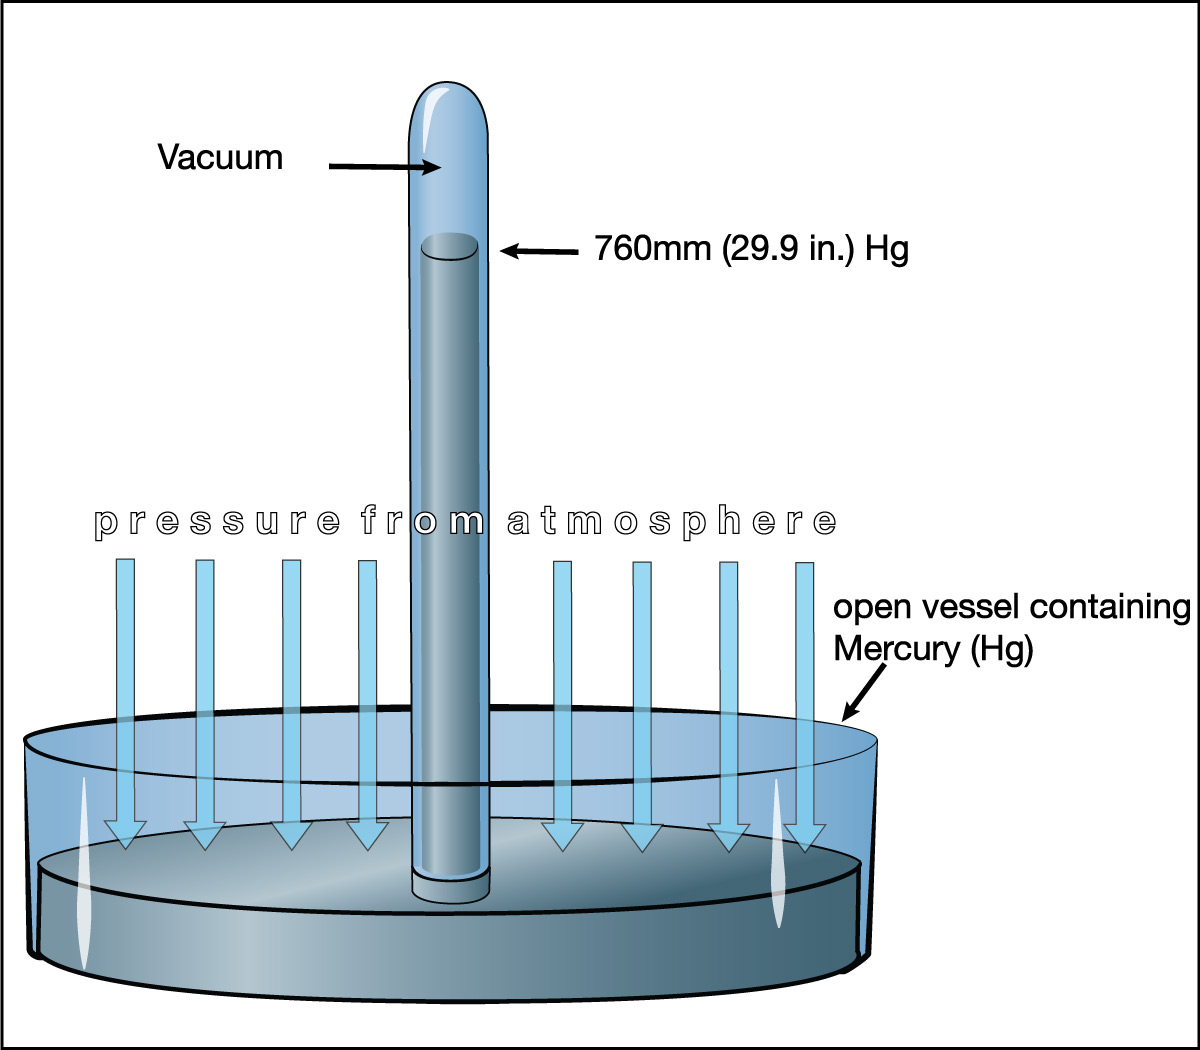
That is why liquid barometers use mercury, which is a liquid metal, instead of water (Figure 6.1.1–9). Mercury is almost 14 times as dense as water, and therefore a mercury barometer needs to be only about 1/14 as tall as a water barometer. More specifically, at sea level on Earth, a mercury barometer will make a column of mercury about 0.76 meters tall, which is the same as 760 millimeters. For this reason, atmospheric pressure is often described as “760 millimeters of mercury” or, equivalently, “29.9 inches of mercury.”
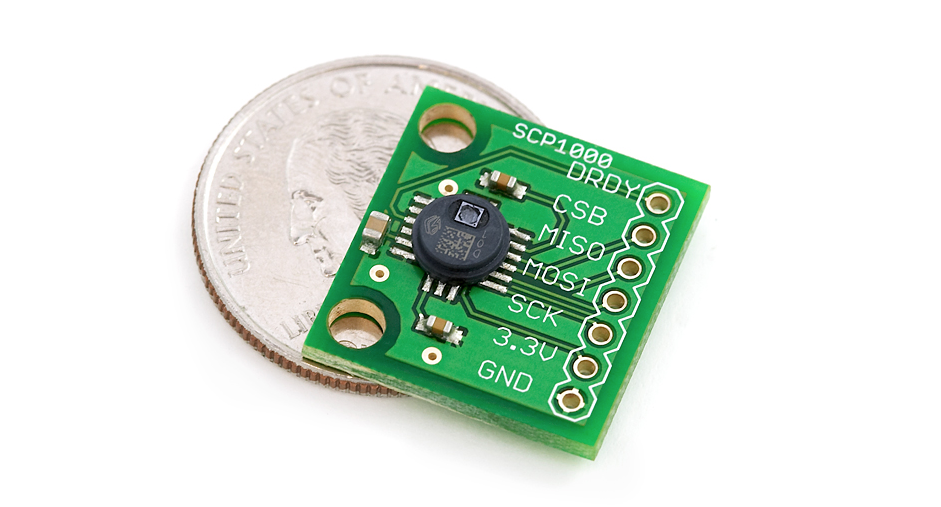
Today, most barometers actually measure relative changes in air pressure , which allows them to be much smaller than mercury barometers, as well as safer (since mercury is toxic). Modern digital barometers are quite small (Figure 6.1.1-10). Indeed, most smart phones now contain one of these tiny sensors, allowing the phone to be used as a barometer .
The value of 760 millimeters that we’ve given for the height of the mercury column is the average atmospheric pressure at sea level. The actual pressure at any moment and any location may be different from this by up to a few percent, and it changes with the weather. That is why you’ll sometimes hear meteorologists talk about a rising or falling barometer, meaning an increase or decrease in the local atmospheric pressure. We’ll return to this idea when we discuss winds in Section 6.2 and weather in Section 6.3.
Activity
Use Your Phone Barometer
Find out if your phone has a built-in barometer. If it does, download a free barometer app (such as “Barometer and Altimeter Pro”). The app settings should give you a choice of units that you can use for the pressure. Start out using millimeters of mercury (“mmHG”) as your units, then do the following.
1. What is the current pressure at your location? Is it close to the sea level average of 760 millimeters of mercury? If not, why not?
2. Start a log in which you record the pressure at your location each day for at least a week. Do you notice any trends with the weather?
3. As we’ll discuss later, weather maps show regions of relatively low pressure with the letter “L” and high pressure with the letter “H.” Each day as you record the pressure (for question 2 above), also check a weather map to see if your location is in a high or low pressure region. What can you conclude about the barometer values that represent high or low pressure for your region?
This optional activity will be possible only if students have smart phones (iOS or Android) that have a built-in barometer. This is standard on most newer Apple and Android phones. You may also need to confirm that students have permission (from parents) to download a new app.
- (1) For this question, be sure that students have figured out how to change the app settings to show millimeters of mercury. Once they’ve done this, the app should show the current local pressure. If you are near sea level, it should be close to the average of 760 millimeters. If it is not, it is most likely because you are at elevation.
Note 1: Many apps (including Barometer and Altimeter Pro) show both local pressure and sea level pressure.
Note 2: You might also want to draw the connection between how the app shows pressure and how it can use pressure to calculate approximate altitude. In fact, apps that show altitude generally use a combination of GPS and the built-in phone barometer to give your approximate altitude. - (2) The log may be something you wish to record each day for the class as a whole, so that they can watch the patterns with the changing weather.
- (3) This question will help prepare students for a more detailed discussion of weather maps to come later in this chapter.
Pressure and Altitude
If you’ve ever hiked up a mountain, you know that the air gets thinner and it becomes harder to breathe with altitude, reflecting the fact that the atmospheric pressure gets lower as you go higher. You can understand why by looking back at Figure 6.1.1–4. Just as would be the case with a stack of pillows, the atmospheric pressure and density is lower at higher altitudes.
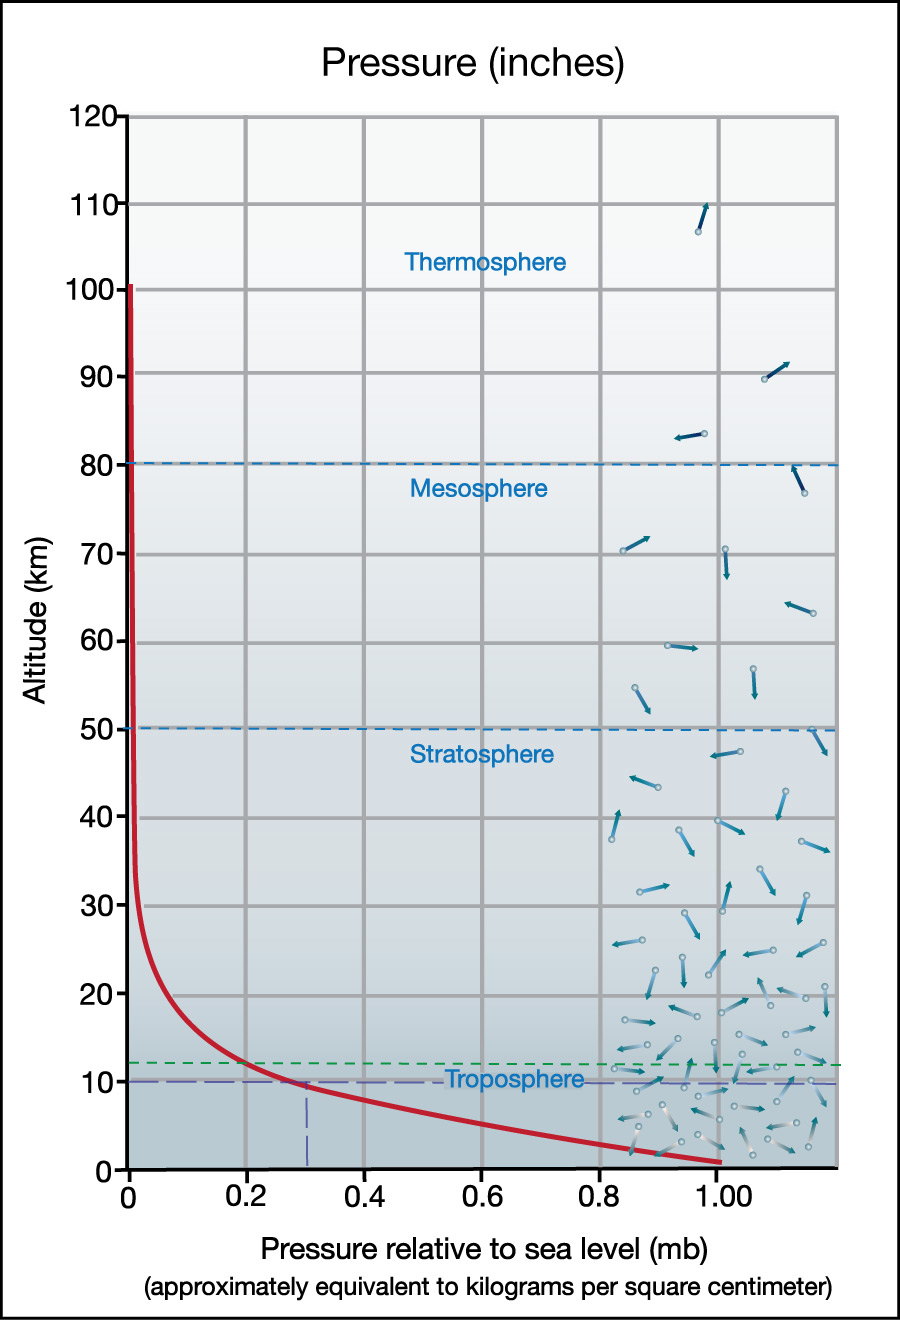
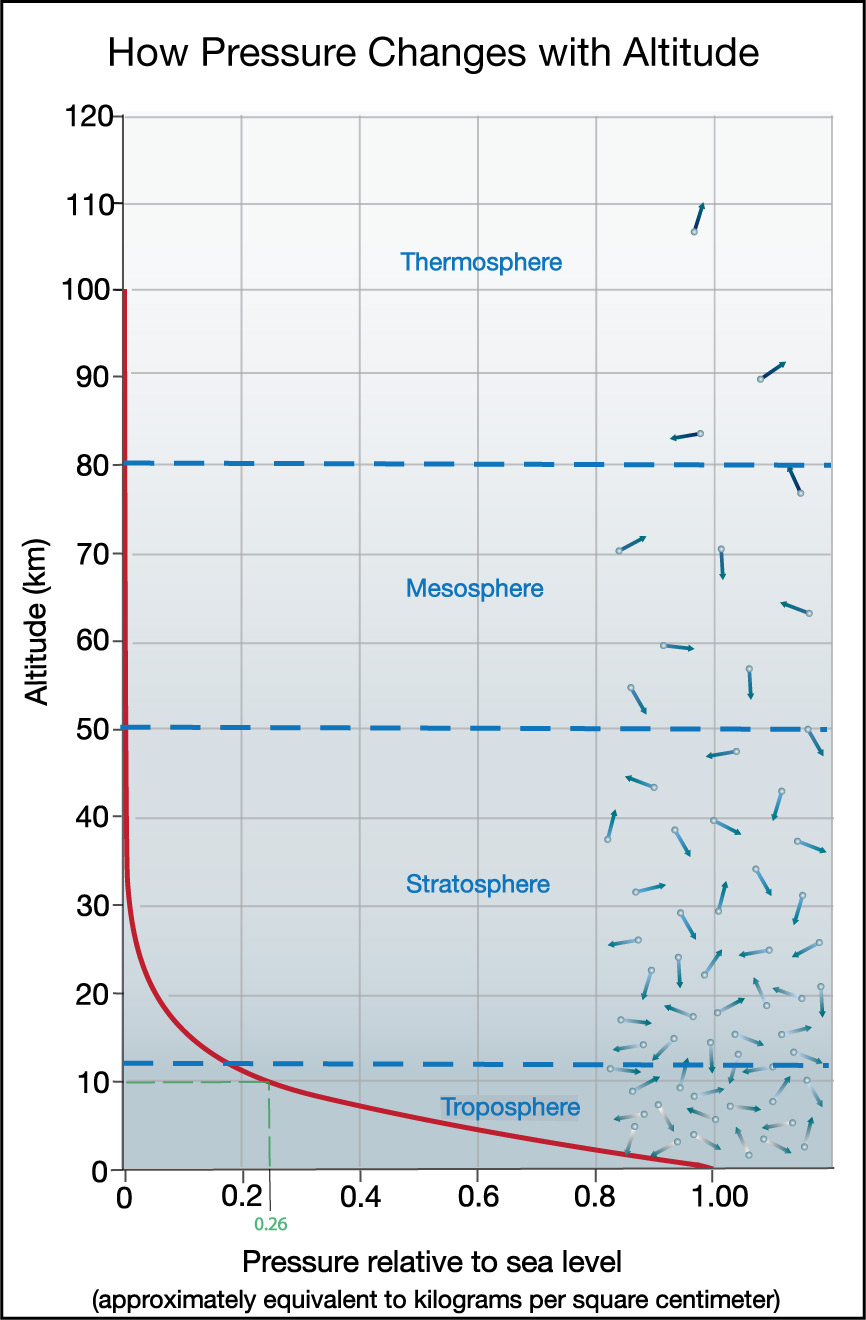
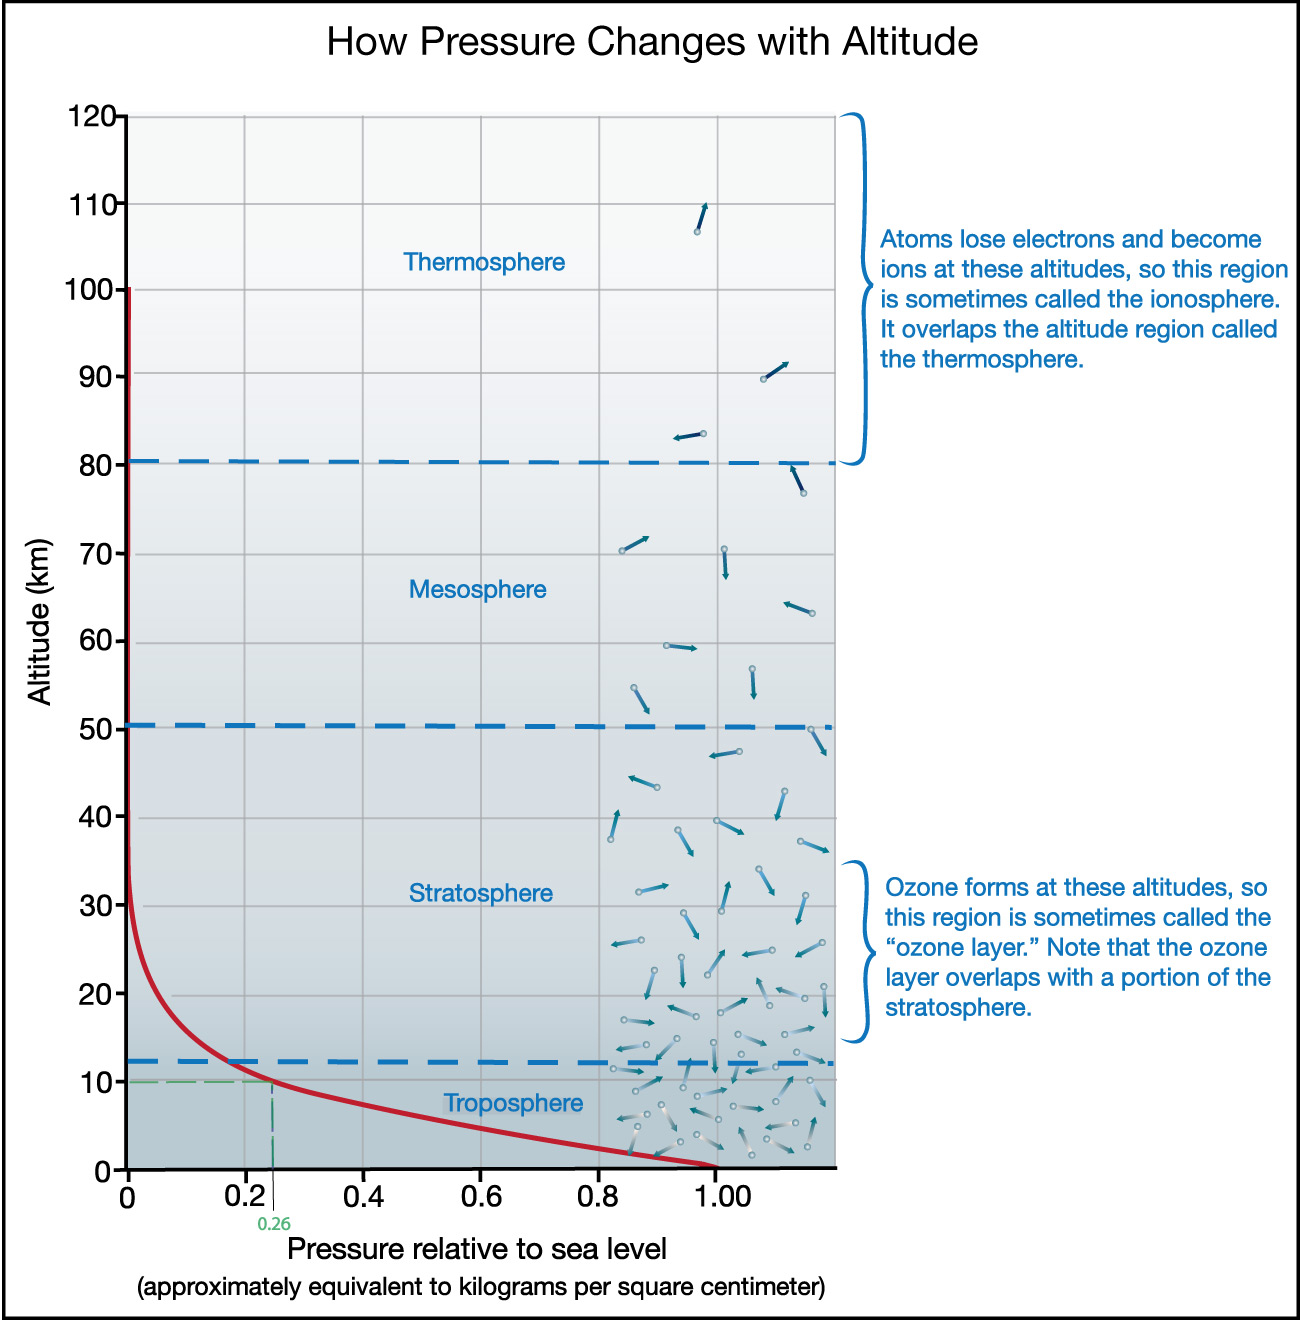
Figure 6.1.1–11 shows a graph of how pressure depends on altitude on Earth. To read this graph, be sure to note that:
- The x-axis shows pressure “relative to sea level.” Therefore, at sea level, the pressure is “1.00,” because it is exactly the sea level pressure.
As you’ve already learned, this sea level pressure is approximately equivalent to 1 kilogram per square centimeter or 760 millimeters of mercury. This pressure is also often given in several other units, so you may see it shown on similar graphs as approximately “1 atmosphere,” as about “1 bar” (1,000 millibars), or as about “100,000 kilopascals (kpa).” - The y-axis shows altitude. Because pressure is lower at higher altitudes, it is easiest to read the graph if you start from where the curve shows you the sea level pressure (1.00) and follow it to the left, so that you see how pressure drops with altitude.
- If you want to know the pressure at any altitude, simply find that altitude along the y-axis, then look where that altitude occurs long the curve, and look down to the x-axis to read the pressure. For example, the light green dashed lines show you that at an altitude of 10 kilometers, the pressure is about 0.26 times that at sea level, or about 26% of the sea level pressure.
You can similarly find the altitude that goes with any pressure by starting with a pressure value on the x-axis, then looking to see the corresponding altitude along the curve. - You can also think of the pressure numbers as telling you approximately how much of the total air in the atmosphere lies above that altitude. For example, the pressure of 0.26 at altitude 10 kilometers means that only about 26% of the total air in the atmosphere lies above that altitude. This also means that 100% – 26% = 74% of the atmosphere lies below an altitude of 10 kilometers.
Quiz – Reading the Pressure Graph
Check that you understand how to read the pressure graph by answering the following questions based on Figure 6.1.1–11.
Note: As always, after you finish the quiz, be sure you read the feedback that explains the correct answers, to make sure you understand the reasons for these answers.
The “Edge of Space”
You might wonder where the atmosphere ends and space begins. There isn’t a clear boundary point, but the rapid drop in pressure with altitude means that almost all of the air in the atmosphere lies fairly close to the surface (see Figure 6.1.1–1). As you go higher, you eventually reach a point where the gas pressure and density becomes so low that it doesn’t make much sense to call it “air” anymore. On Earth, this occurs at an altitude of about 100 kilometers. Above this altitude, the air is so thin that the sky is black and you can see stars even in the daytime. For this reason, an altitude of about 100 kilometers is often called “the edge of space.”
Note, however, that small amounts of gas are still present for another few hundred kilometers above this (Figure 6.1.1–12). The International Space Station and many satellites orbit Earth within these outer reaches of the atmosphere, and the low-density gas exerts a little bit of drag on these orbiting spacecraft. That is why satellites in low-Earth orbit slowly spiral downward, eventually burning up as they reenter the denser layers of the atmosphere.
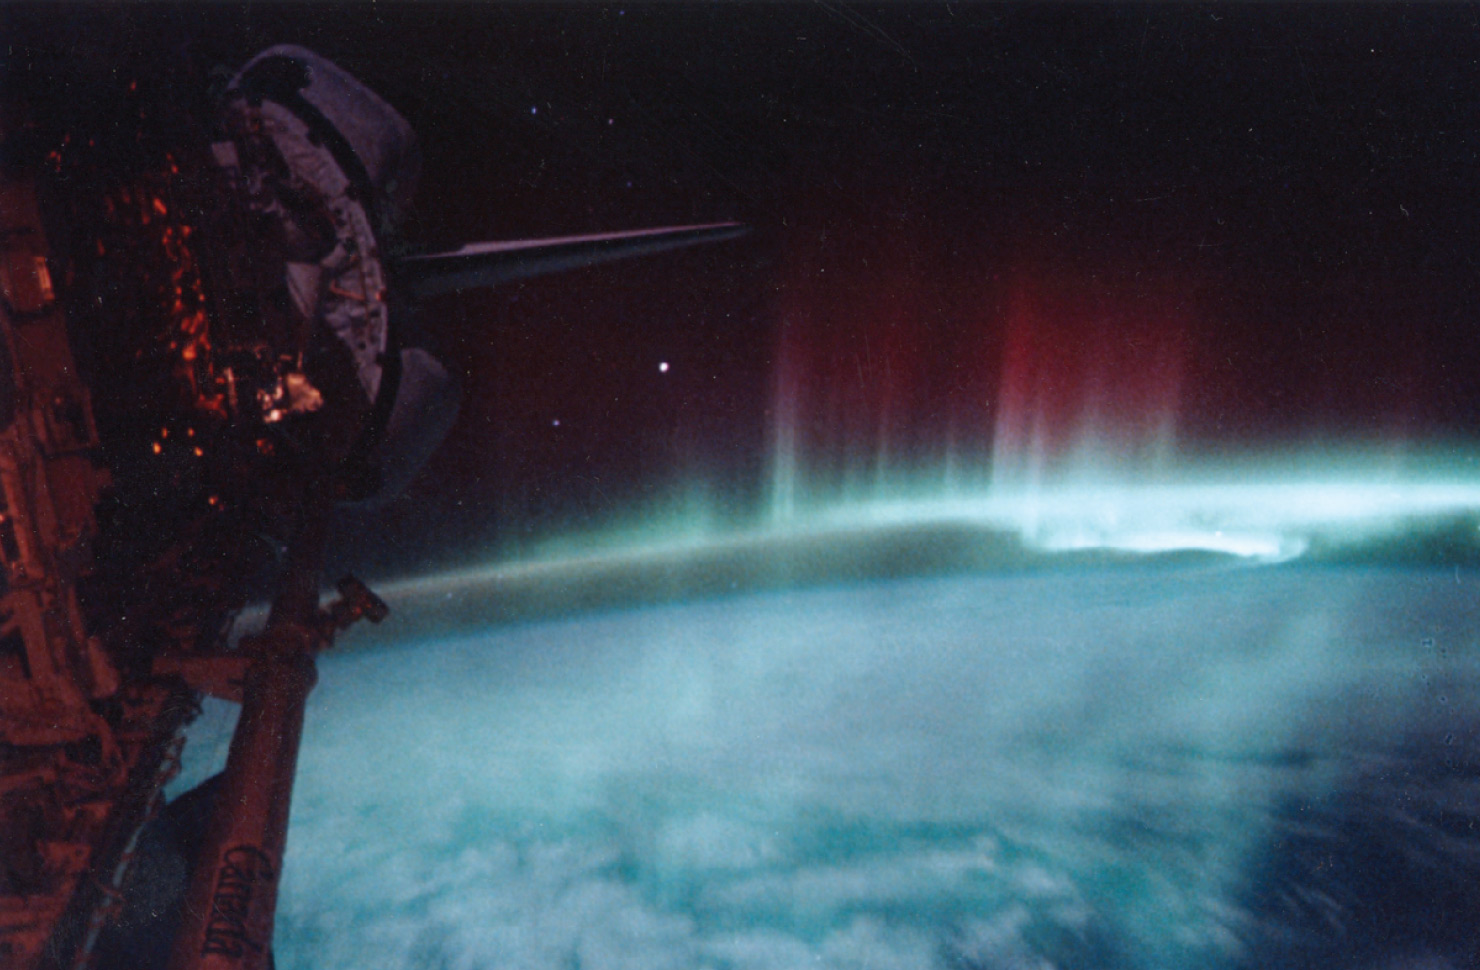
Figure 6.1.1-12 – Like the International Space Station, the Space Shuttle orbited low enough to still have a
little bit of atmospheric gas around it. This photo shows the visible glow of this low-density gas around a
Space Shuttle’s tail. The colorful spikes of light in the distance are the aurora as seen from space.
Credit: NASA.
Atmospheric Composition
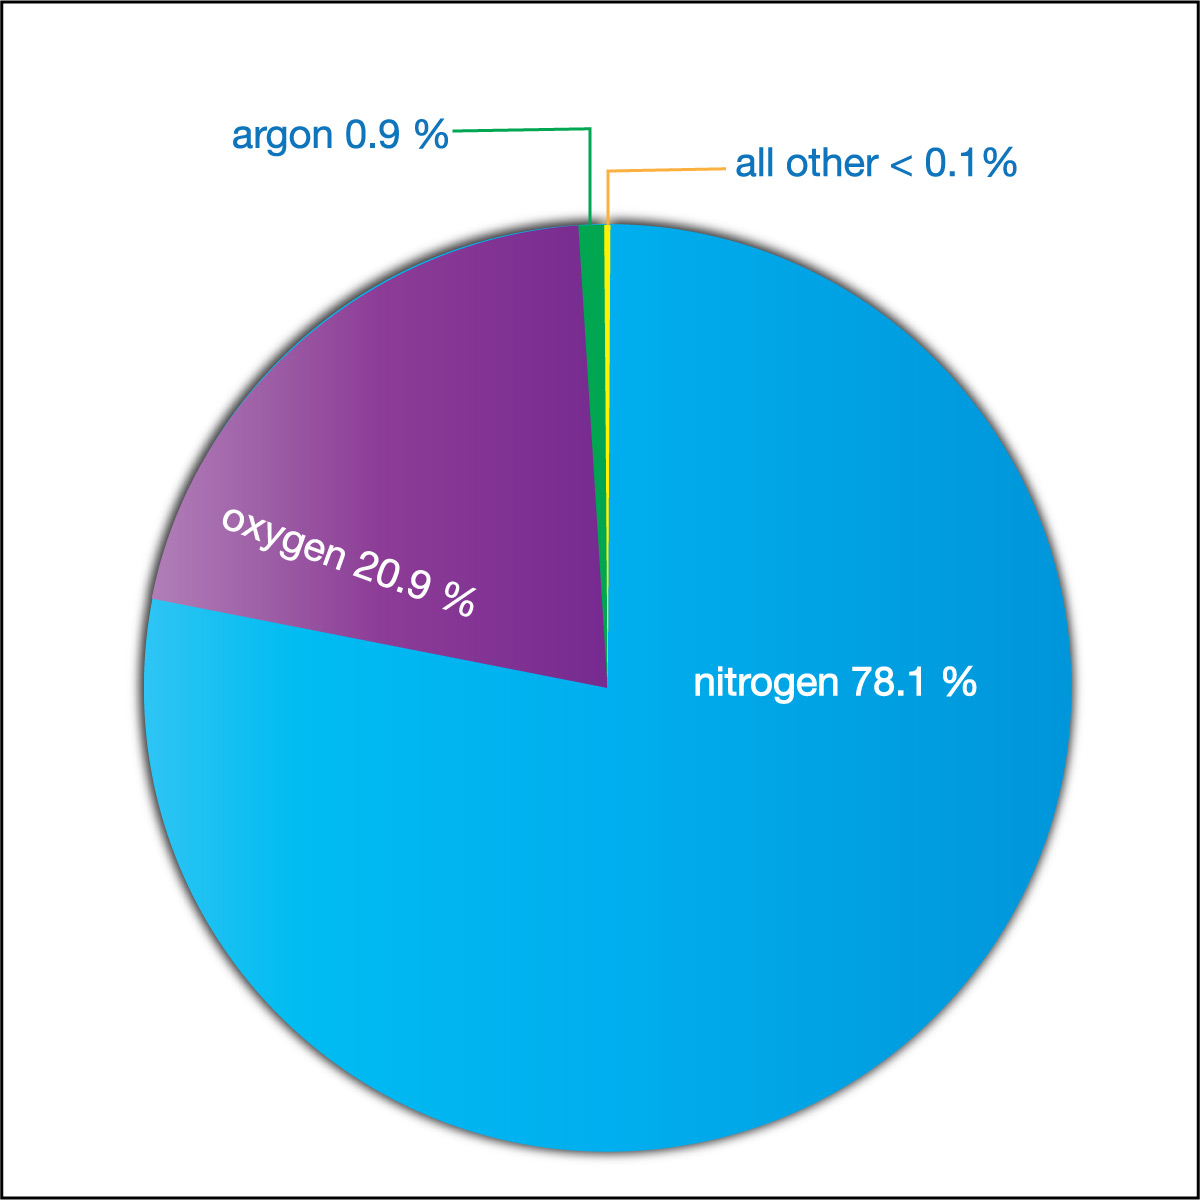
As you’ve learned in the past and we reviewed in Table 4.3.1-2, Earth’s atmosphere is made up almost entirely nitrogen and oxygen. More specifically, if we ignore dust, clouds, and water vapor in the atmosphere, the atmosphere is about 78.1% nitrogen and 20.9% oxygen, which means that nitrogen and oxygen together make up about 99% of the “dry” atmosphere . Most of the remaining 1% is a gas called argon. All other gases, including carbon dioxide, make up less than 0.1% of the gas in Earth’s atmosphere. Figure 6.1.1–13 shows a pie chart representing the composition of the dry atmosphere.
Composition and Altitude
You already know that atmospheric pressure drops dramatically with altitude (see Figure 6.1.1–11), so you might wonder if this affects the atmospheric composition. In general, the answer is no: Although the air density gets much lower with altitude, which means there is less gas of all types as you go higher, the chemical makeup of the gas stays nearly the same.
However, there are two small but important changes that occur in the chemical makeup at high altitudes. Both result from the way air interacts with the different forms of light coming from the Sun (see the Brief Review below if you need to review the different forms of light). Here is how you can understand these two important changes:
- Remember that oxygen molecules in the air generally consist of two oxygen atoms, which is why its chemical formula is O2. However, at some altitudes in the stratosphere (mostly between about 15 and 35 kilometers), some of the oxygen changes to a form with a third oxygen atom, making it O3. This form of oxygen is called ozone , and it is very important to us because it absorbs harmful ultraviolet light from the Sun. The region of the atmosphere in which ozone is found is sometimes called the ozone layer .
- At even higher altitudes, the gas in the atmosphere is exposed to x-rays from the Sun. These x-rays can break the molecules apart and strip some of the electrons away from the atoms, turning them into what we call ions . For this reason, the upper part of Earth’s atmosphere in which ions are common is sometimes called the ionosphere .
Figure 6.1.1–14 shows where the ozone layer and ionosphere are located on the graph that you saw earlier (in Figure 6.1.1–11).
Clouds and Humidity
The atmosphere has one other major component besides those shown in Figure 6.1.1–13: water. The water can be in any of the three basic phases , meaning it can be solid crystals of ice, liquid droplets, or the gas we call water vapor . The amount of water in the atmosphere can vary quite a bit:
- On a very dry day, the water content of the atmosphere (counting all three phases combined) can be much less than 1%.
- On a very wet day it can be up to about 4%.
This variability explains why we don’t show water in the pie charts of Figure 6.1.1–13.
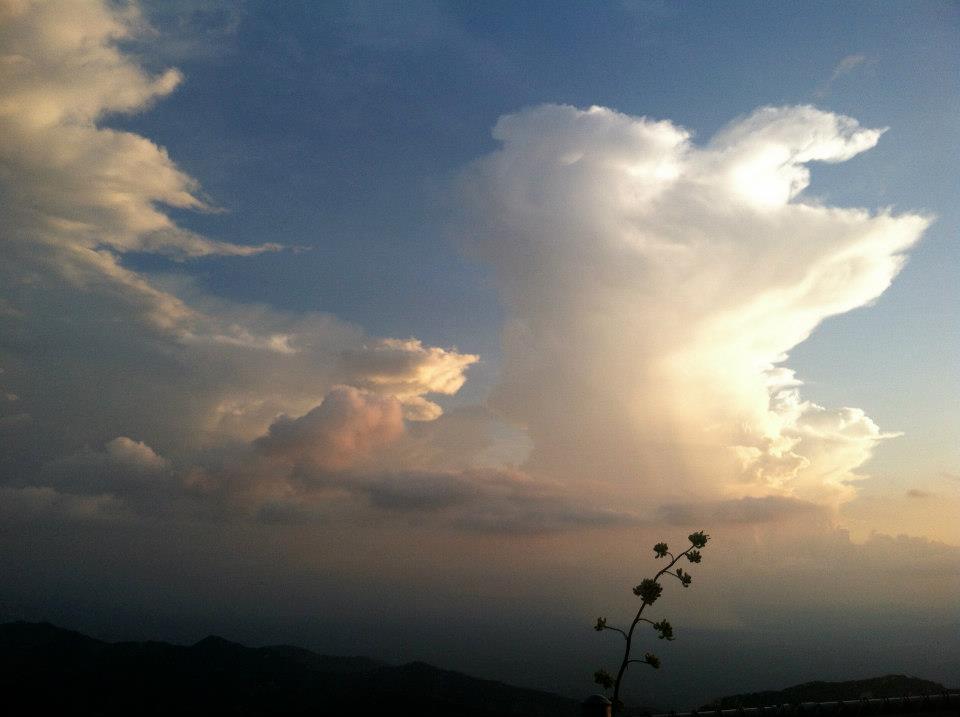
Note that water vapor is invisible. Therefore, contrary to a common misconception, clouds are not made of water vapor. Clouds form when water vapor condenses to make either tiny droplets of liquid water or tiny crystals of ice. We can see the clouds because these water droplets or ice crystals reflect sunlight (Figure 6.1.1–15). The water droplets or ice crystals in clouds are usually very small, which is why they can remain suspended in the air. However, if they grow larger and heavier, then they will fall as rain or snow (or sleet or hail ).
The fact that we can see (and feel) water droplets or ice crystals makes it easy to get a general sense of how much liquid or solid water is in the air. But how do we describe the amount of invisible water vapor in the air? The answer is that we use the term humidity : a higher humidity means more water vapor in the air. We’ll talk more about humidity later in the chapter, for now keep in mind this simple idea: Warmer air can hold more water vapor than cooler air. Therefore, when air cools, it is more likely that water vapor in it will condense. That is why clouds usually form at high altitudes where the air is colder. It is also why we often see condensation on cold surfaces, such as dew that forms on plants or the ground on many mornings, or the condensation we often see on car windows (which tend to stay cooler than the surrounding air).
Discussion
Seeing and Feeling Water in the Air
We’ve stated that you can’t see water vapor, and you really can’t feel it either. Rather, what we can see and feel is water vapor that has condensed to make tiny liquid droplets (or solid ice crystals). Use this idea to answer and explain:
- What do we see when we see steam coming out of a kettle of boiling water, and why does the steam feel wet? CAUTION: Do not put your hand directly over steam coming out of a kettle, which is very hot and will burn your hand! If you want to feel the wetness of the steam, be sure to move your hand through it quickly and fairly far from the spout.
- Why can we sometimes see our breath on a cold day?
- If you wear glasses (or sunglasses) outside on a cold day, you may notice them fog up when you enter a warm building. Why?
This can be a very brief discussion, designed to help students think about the difference between invisible water vapor and the droplets or ice crystals that form when the vapor condenses to liquid or solid phase. The key idea in all cases is that colder temperatures increase condensation.
- (1) The boiling water is releasing water vapor that is very hot. As it makes contact with the cooler surrounding air, some of the water vapor condenses into liquid droplets. These droplets are what we see as the steam, and they are also what make it feel wet.
- (2) When we breathe, we breathe in and out any water vapor in the air. Inside our lungs, this water vapor is warmed by our body temperature. Therefore, when we exhale, the water vapor in our breath is warmer than the outside air, so the cold outside temperatures can cause some of it to condense into liquid droplets that we can see and feel.
- (3) Your glasses are cold because they were outside. So when you come inside, water vapor that touches them will tend to condense into liquid droplets, making the fog that you see on them.
Dust and Aerosols
There’s one final component that we often find in the atmosphere besides its basic gases and water: small particles, such as particles of dust, that are suspended in the air. Larger particles of dust are heavy enough that they tend to fall out of the air fairly quickly, but smaller particles, which are called aerosols (a term that can also apply to tiny water droplets) can sometimes stay in the air for days, weeks, or longer.
Some aerosols, such as small particles released by volcanoes or wildfires, are a form of “particulate pollution” that can damage our lungs when we breathe them in. We won’t discuss aerosols much more in this book, but they have many important effects on our atmosphere and on the air we breathe.
Atmospheric Temperature: Four Major Altitude Layers
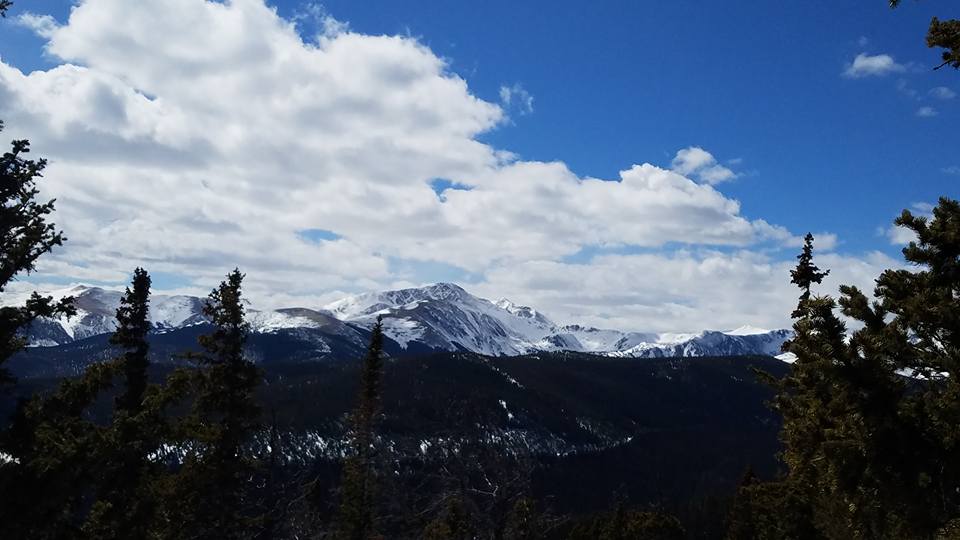
If you hike up a mountain, you’ll generally notice that in addition to the air becoming thinner with altitude, it also becomes colder. This fact explains why snow is more likely on tall mountains than at lower altitudes in the same geographical regions (Figure 6.1.1–16).
This trend that we see with mountains continues upward even above the altitudes of the highest mountains. For example, most commercial airplanes fly at altitudes close to 10 kilometers, and if you’ve ever listened to a pilot tell you about outside conditions on such a flight, you’ll know that the outside temperatures at that altitude are typically below −50°C (about −60°F).
Discussion
Rolling Down Your Airplane Window (or Not)
Have you ever wished you could roll down the window on an airplane flight so you could feel the air rushing by? If so, you might want to rethink that wish. Discuss the following questions in small groups or as a class.
- Identify at least three reasons why rolling down an airplane window during flight would be a very bad idea. Assume we are talking about a commercial jet flight. Hint: Consider the outside temperature, outside pressure, and the airplane’s speed.
- Your answers to the first question should make it obvious that airplane cabins must be heated and pressurized. In fact, airplane cabins are typically pressurized to keep the inside air at a pressure equivalent to that found at an altitude of about 1,800 meters (6,000 feet). What would happen if a door suddenly opened or a hole was blown in the cabin while the airplane was flying at high altitude?
- If you’ve ever flown, you know that flights always begin with safety instructions. These tell you that you should generally keep your seat belt on at all times and that, in the event of a sudden cabin depressurization, you should put on the oxygen mask that will automatically drop down from the overhead bin above you. Briefly discuss how these instructions would keep you safe in a depressurization event.
- What do you think the pilot should do if a sudden depressurization event occurs?
This brief discussion will help students think about how conditions change with altitude, as well as about safety in an airplane depressurization event.
- (1) The three major reasons are: (1) Temperature: As stated in the main text above, it is extremely cold at the altitudes that commercial airlines generally fly. (2) Pressure: Students should review Figure 6.1.1–11 and see that the air pressure at 10 kilometers is only about 26% of that at sea level, which is too low to breathe; that is why airline cabins must be pressurized. (3) Speed: Airplanes are flying at very high speeds, so even with the lower outside air density, the force of the wind would be extreme if your window was open.
- (2) Students should recognize that because the inside air pressure is much higher than the outside pressure, the air would rapidly rush out of the airplane cabin. This creates what is called depressurization event. Note that nothing is “sucked out” of the plane. Rather, anything that is “in the way” of the air rapidly moving to the outside will be pushed along with it by the pressure difference. Therefore, if you are not held in place (such as by your seatbelt), the rushing air could blow you out of the plane. Once the inside pressure equalizes to the outside pressure, you have a new set of problems, which is that it is now very cold and the air is too thin to breathe.
- (3) The safety protocol keeps you and other passengers safe as follows:
Seatbelt: As discussed in question 2, depressurization can blow you out of the plane if you are not held in place. The seatbelt can therefore keep you in place, preventing a rapid death. Note: Although some airlines allow infants to be held in laps, a depressurization event causes such strong outrushing air that it is almost impossible for an adult to hold an infant tightly enough to prevent them from being carried off. This is why it is much better to have infants seated in car seats that are buckled down by the seat belt.
Oxygen mask: Once the inside pressure equalizes with the outside pressure (a matter of seconds), the air is too thin for you to breathe. The oxygen mask solves this problem by directly supplying oxygen. Note: The reason they tell you to put on your own oxygen mask before helping children or others is because you can black out fairly quickly with the thin air. Once you black out, you can’t help anyone. By putting your own mask on first, you ensure that you stay conscious and are able to help other people. - (4) The pilot should rapidly take the plane down to lower altitude, where it will be warmer (as well as higher pressure), then look for a safe place to land.
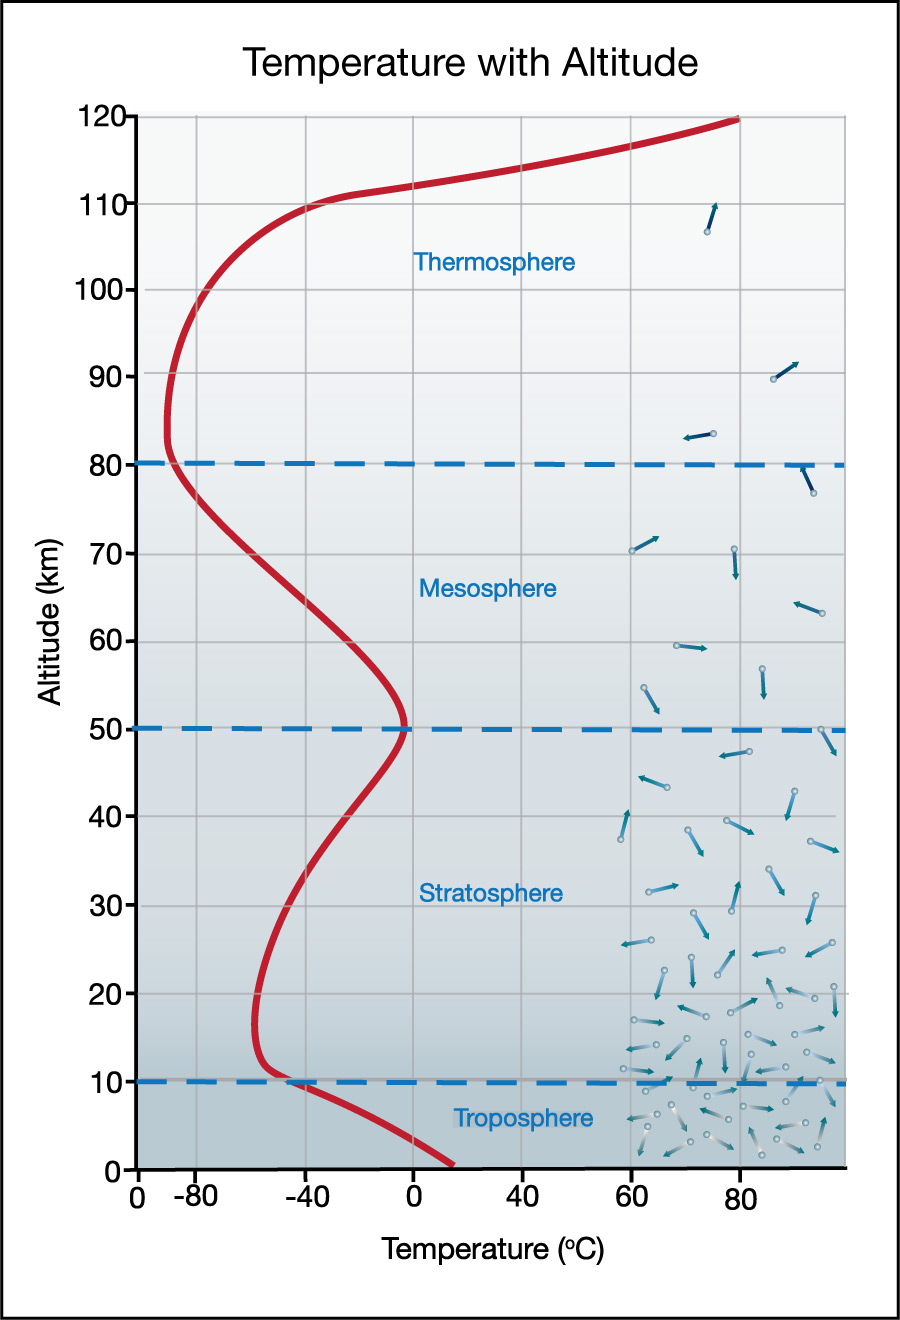
However, if could keep going upward (or use a weather balloon to make temperature measurements at higher altitudes), you’d find that that the simple pattern of declining temperatures comes to an end at an altitude that averages around 12 kilometers . Above that, temperature follows a more complex pattern with altitude. Figure 6.1.1–17 shows the pattern. As you study the figure, notice that the temperature pattern defines the following four layers in our atmosphere, starting from the surface:
- The troposphere is the lowest layer, extending to an average altitude of about 12 kilometers. Here, the temperature drops with altitude, just as we’ve discussed for climbing mountains or flying on commercial airplanes.
Note that unless you become an astronaut, you will probably spend your entire life in the troposphere, since it extends to an average altitude above any mountain top and higher than most commercial airplanes fly. - The stratosphere begins where troposphere ends. Here, the temperature rises with altitude, rather than falling. This trend of rising temperatures continues to an altitude of about 50 kilometers.
- The mesosphere lies above the stratosphere. Here, the temperature once again falls with altitude, with this trend continuing up to about 80 kilometers in altitude.
- The thermosphere is the uppermost layer of the atmosphere. Here, the trend changes one last time, with temperature again rising with altitude.
This temperature pattern with altitude may at first seem a bit strange, but you can understand it using ideas you’ve learned previously. The following questions will help you do that.
Discuss each question with a classmate, then click to open the answer to see if it agrees with what you came up with.
Hint: Remember that the Sun emits many types of light into space, including visible light, ultraviolet light, and x-rays. Think about what happens to these different forms of light in Earth’s atmosphere.
- Let’s begin at the top of Figure 6.1.1–17. The fact that temperatures rise with altitude in the thermosphere means that some form of light from the Sun must be providing the energy to heat the air at these high altitudes. What form of light is it, and how does it also explain why the ionosphere (as discussed earlier) overlaps with the thermosphere?
It is x-rays from the Sun, which are absorbed by atoms high in the atmosphere, causing the atmosphere to heat up at these altitudes. The x-rays can also strip electrons from atoms to create the ions that make up the ionosphere.
- The temperature “bump” near the top of the stratosphere (and bottom of mesosphere) similarly tells us that some form of light from the Sun must be providing energy to heat this region of the atmosphere. What type of light is it, and what is absorbing this light? Hint: Think about what you’ve already learned about ozone .
It is ultraviolet light from the Sun, and ozone is absorbing the energy of this light, heating this region of the atmosphere. You’ll know this if you recall that ozone is located at altitudes around temperature “bump” in the graph (in what we call the ozone layer ) and that ozone absorbs ultraviolet light.
- Visible light from the Sun reaches the surface, where it can be absorbed by the ground and oceans, heating them up. How does this fact explain why temperature declines with altitude in the troposphere?
The absorption is occurring at or near the surface, which effectively makes the surface a source of warmth. Therefore, as you go higher in altitude, you are getting farther from this source of warmth, which is why temperatures drop. (The trend reverses in the stratosphere, because you are now moving closer to the heating caused where ozone absorbs ultraviolet light.)
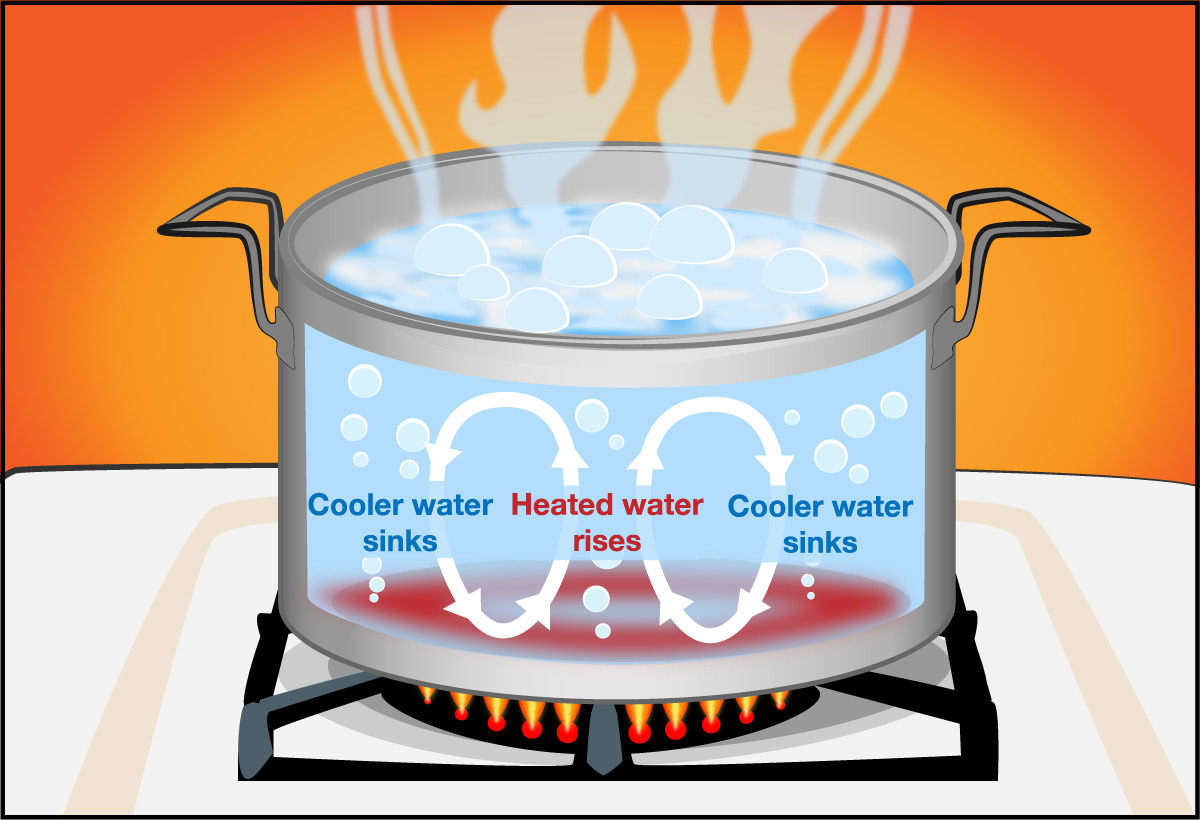
- How does the fact that temperature declines with altitude in the troposphere explain why air in the troposphere can undergo convection ? Hint: Be sure to review the discussion of convection in Section 5.3.2.
Convection can occur whenever there is heating from below, and in this case the “below” is the surface (ground, oceans) that heats air above it. Just as in the convecting pot of water shown in Figure 5.3.2–4 except with air, warmer air is less dense and rises upward, while cooler air high in the troposphere is more dense and sinks downward.
- There is no convection in the stratosphere, which is what makes its air stratified (layered). How does the fact that temperature declines with altitude in the stratosphere explain its lack of convection?
Building on the previous question, convection requires heating from below. But the heating in the stratosphere is occurring near its top (in the temperature “bump”), and it is coldest at its bottom. Therefore convection cannot occur.
- Notice that temperatures in the thermosphere rise quite high. Yet if you could somehow go outside at such a high altitude, you’d find that it would feel extremely cold, and you’d need a heated and pressurized flight suit (or spacesuit) to survive. Why? Hint: Think about the density of the atmosphere at very high altitudes and review the difference between temperature and heat in Section 4.2.3..
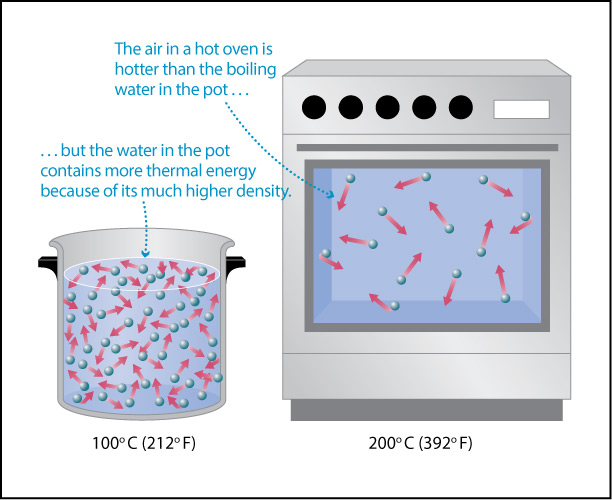
The heat that you feel depends on both temperature and density (see Figure 4.44), and the air density in the thermosphere is extremely low. Therefore, although the high temperature tells us that the atoms and molecules are moving very fast in the thermosphere, there are so few of them that they cannot transfer much heat to your body. That is why you would feel cold despite the high temperature.
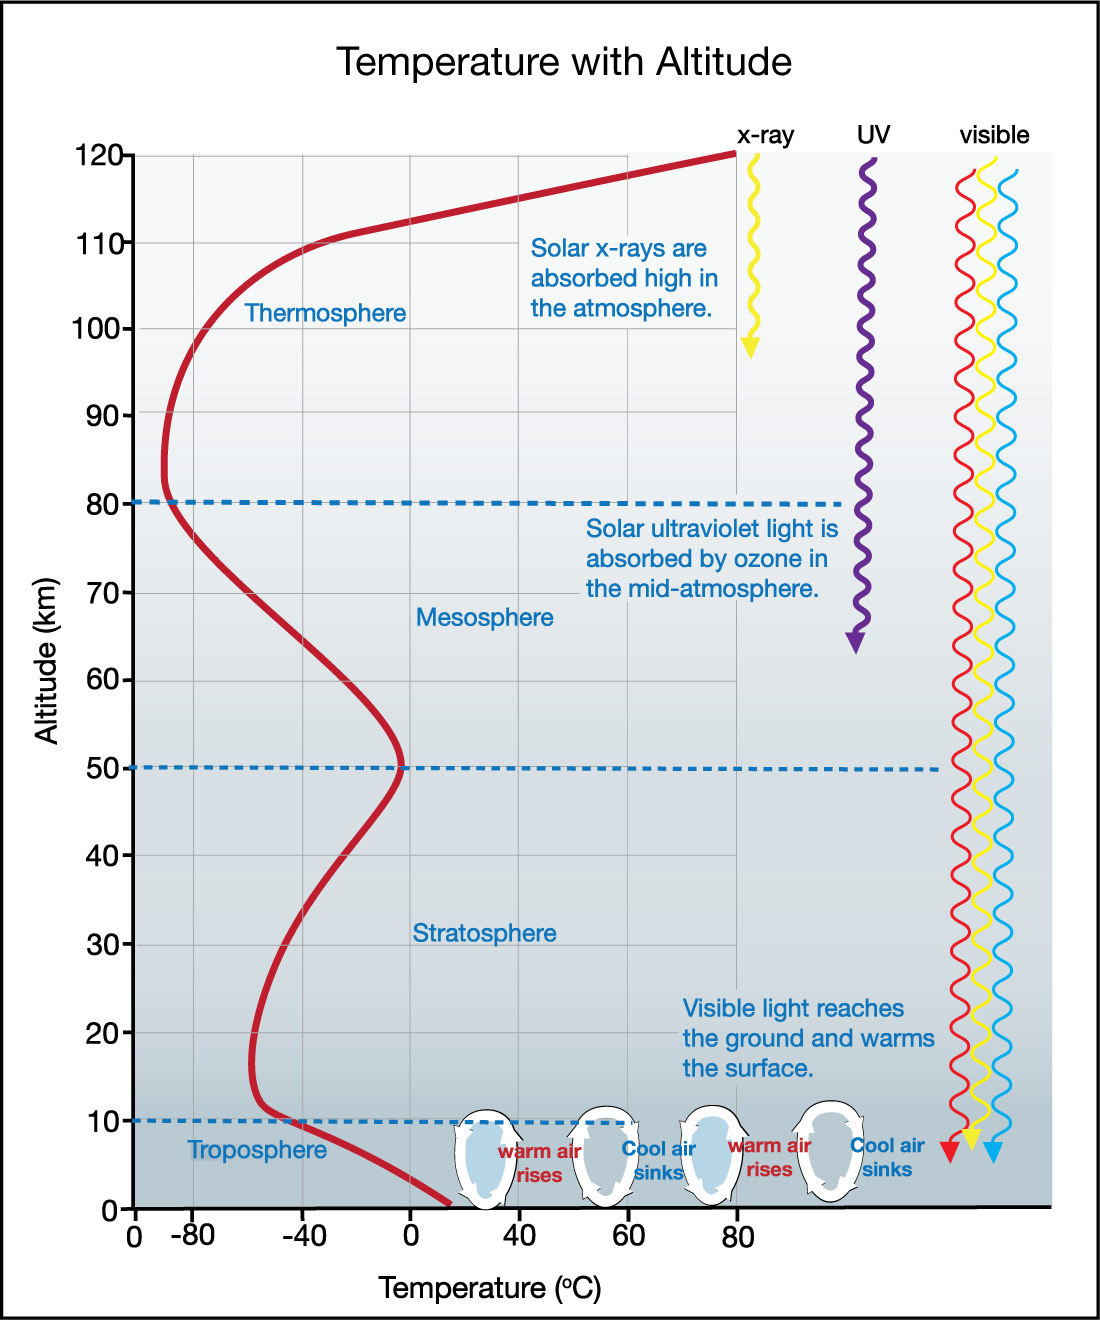
If you’ve answered the above questions successfully, you now know that the temperature pattern with altitude is the result of heating that occurs in three regions of the atmosphere:
- heating at the surface as the ground and oceans absorb visible sunlight,
- heating in the stratosphere as ozone absorbs ultraviolet light from the Sun, and
- heating in the thermosphere as atoms absorb x-rays from the Sun.
Figure 6.1.1–18 summarizes these ideas, and also shows convection occurring in the troposphere.
Connections—Etymology
Layers of the Atmosphere
The names of the four major atmospheric layers may sound strange at first, but if you think about what they mean, you will see that they all make sense.
- First, notice that all four contain the word “sphere,” which should make sense since all four layers are part of the atmosphere that goes all the way around our spherical planet.
- The troposphere gets its name from the convection that occurs within it, in which warm air rises and cool air falls. Tropos is a Greek root that means “turning,” and convection can be thought of as a “turning over” (or vertical mixing) of material.
- The stratosphere get its name from the fact that the air within it tends to be stratified (layered). Notice the similarity to the term strata that we use for rock layers in geology. Both words come from a Latin root meaning “spread out” or “laid flat.”
- The Greek root mesos means “middle” or “in between,” so the mesosphere is simply the layer in between the stratosphere and thermosphere.
- The Greek root thermos means hot, so the thermosphere gets its name from the high temperatures that occur at high altitudes within it.
Discussion
The Atmosphere and Us
By now you’ve learned a lot of ways that the atmosphere is important to our survival. To make sure you understand them, discuss the following questions in small groups or as a class.
1. In Section 4.3.1 you learned that water cannot remain liquid outside on Mars (see Figure 4.53). What is it about our atmosphere that explains why Earth can have liquid water and surface oceans?
2. In addition to visible light, the Sun also emits a lot ultraviolet light and x-rays, both of which would kill us if they reached the surface. How does the atmosphere protect us from these dangerous forms of light?
3. Why do commercial airlines need to have pressurized cabins?
4. Why couldn’t astronauts survive in space with just an oxygen tank rather than a full spacesuit?
5. Without an atmosphere, Earth would be too cold for life. How does the atmosphere make our planet warmer?
6. Could we survive on another planet that had an atmosphere with the same pressure and temperature as Earth but a different composition? Explain.
This discussion is designed to help students consolidate their understanding of the roles that the atmosphere plays in our lives.
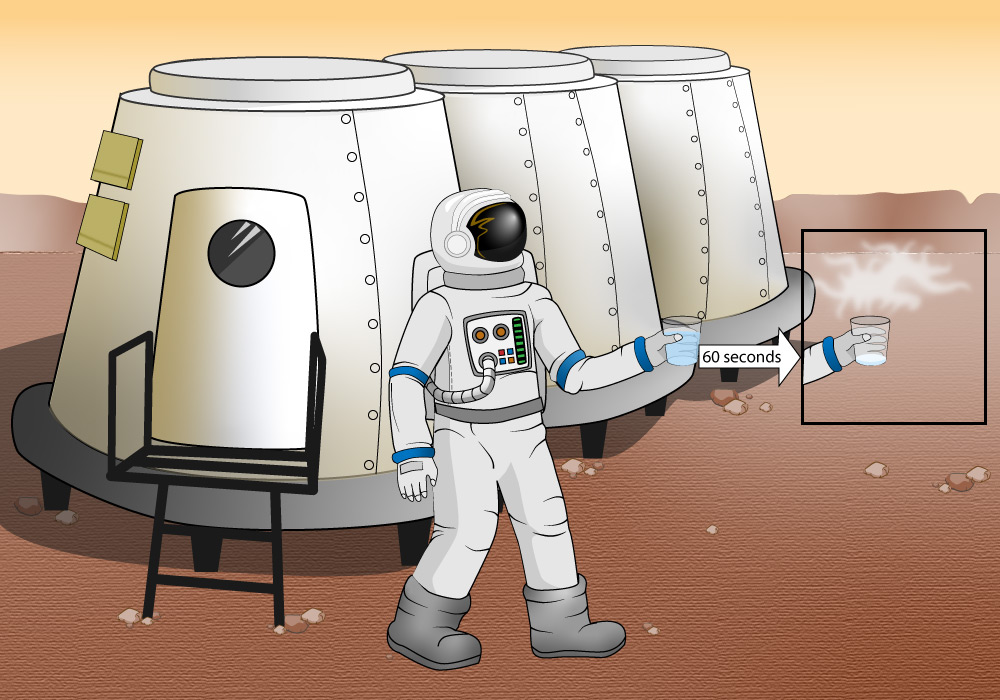
- (1) Atmospheric pressure makes it possible for water to remain liquid. Without this pressure, liquid water would either freeze (if it is cold) or quickly evaporate (if it is warm).
- (2) The atmosphere absorbs both ultraviolet light and x-rays before they can reach the ground. X-rays are absorbed in the thermosphere, and ultraviolet by ozone in the stratosphere (or “ozone layer”).
- (3) We depend on the air pressure both because our bodies are adapted to the pressure at Earth’s surface and because breathing becomes difficult or impossible at low pressures. Airplanes fly high enough for the pressure to be quite low, requiring pressurization for us to breathe.
- (4) Astronauts need spacesuits both for pressurization (and heating) and for protection from solar radiation.
- (5) Although we have not yet discussed how the greenhouse effect works (we’ll do that in Chapter 7), students should by now know that it is an effect of the atmosphere that makes a planet warmer than it would be otherwise.
- (6) We could survive on another world with the same pressure and temperature only if it still had abundant oxygen, because we (and all animals) need oxygen to survive.