As we discussed in Chapter 1, we now know that Earth is a planet orbiting the star we call the Sun, which is one of more than 100 billion stars in our Milky Way Galaxy, which in turn is one of billions of galaxies in our universe. But these facts are not obvious when we simply look up at the sky.
Put yourself in the place of someone living in a small village many thousands of years ago. If you ignored any hills and valleys, the world looked flat and the sky appeared to form a simple dome above you. During the daytime you’d see the Sun travel east to west across the sky dome, and at night the dome was speckled with stars. Because you were unlikely to ever travel far, and because communication was difficult even with nearby villages, it would have been natural for you to assume that your local landscape and local sky represented all that there is. Therefore, you probably would have assumed that the world really was flat and covered by a sky dome, as illustrated in Figure 2.2.

The concept shown in Figure 2.2, in which we imagine a flat-Earth covered by a dome-shaped sky, is an example of what we call a model of nature. In science, models are usually mental or conceptual, and they are useful when they allow us to make predictions that test their validity. If a model’s predictions prove accurate, then we have reason to think that it might accurately reflect reality; if its predictions fail, then we know the model is flawed.
Today we know that the “sky dome” model is seriously flawed. For example, because it has the entire world covered by a single dome, it predicts that everyone in the world would always see the same sky at the same time. While this prediction might have seemed reasonable to someone living in a small village long ago, we now know that people living in different locations do not all see the same sky at the same time, which means the Earth cannot be a flat world covered by a dome. Nevertheless, this flawed model can still be useful in limited circumstances, such as when we are discussing the appearance of the local sky.
Key Concepts: Scientific Models
Scientific models differ somewhat from the models we typically encounter in everyday life. In our daily lives, most models are miniature physical representations, such as model cars or airplanes. In contrast, a scientific model is a mental or conceptual representation created to explain and predict observed phenomena, and it must do so in a way that we can test through observations or experiments. Models that pass these observational and experimental tests are likely to reflect reality; for example, the modern model of the universe that we discussed in Chapter 1 (in which Earth is a planet orbiting the Sun) allows us to make very precise predictions, and these predictions have proven accurate in every test ever made with them. Other models may only work in more limited circumstances, in which case we presume they don’t reflect reality, even though they may sometimes be useful. This is the case with the sky dome model, which can be useful for describing your local sky, despite the fact that it does not represent what is actually happening in space.
Group Discussion
Flaws of the Sky Dome
While the sky dome model reflects what the sky looks like locally, there are numerous observations you can make that prove it does not provide a full view of reality. Consider the following two observations:
- As a tall ship sails into view on the horizon, the first thing you see is the top of the mast, with the rest of the ship then gradually coming into view.
- If you climb a tall mountain, or go to the top of a tall building, the horizon is farther away than it is from the ground.
Discuss:
- How and why is each of the above observations inconsistent with the sky dome model?
- There are very few written records of what our distant ancestors actually believed about Earth and sky. Do you think that many of our distant ancestors would have taken the sky dome model seriously? If they did, do you think they were “wrong” to do that? Defend your opinions.
Teacher Notes: This activity can be done in small groups, but might be better done as full class discussion with you taking the lead. Key points to help students understand:
- For question 1: The sky dome model implies a fixed horizon – one that literally comes to an end somewhere, so that in principle a person could travel to the edge and poke their head out, just like the person illustrated in Figure 2.2. Therefore:
- The fixed horizon means you could not have a ship gradually come into view as in the first observation below, so this observation is inconsistent with a sky dome model.
- Nor could the horizon distance vary, which means the second observation below would also be impossible if there really were a sky dome.
- For question 2: These are opinion-based questions, but some points to consider:
- There’s really no way for us to know exactly what our ancestors thought about Earth and sky and, in fact, it’s unlikely that they even entertained the idea of models of the universe, since our modern conception of models arose gradually from ideas developed by the philosophers of ancient Greece. More likely, any mental model they had for the world was used only to the extent that it was functional (e.g., allowing them to identify and describe locations), and would not have been taken seriously as a true representation of the universe.
- Even if they did take the model seriously, it’s difficult to say that they were “wrong,” because they had no way to know better. Even the two observations we’ve discussed would have been very difficult to make, because for most of human history there were no tall ships (and this observation would only have applied to those people who lived near the sea) and no tall buildings, and mountain-climbing was probably not a common activity.
- Important note 1: As we’ll discuss in the next subsection (and is noted in the key concept box above), the sky dome is still sometimes a useful model locally; we just need to be always aware that it does not reflect reality.
- Important note 2: In recent years, a few celebrities and conspiracy theorists have gained an internet audience for claiming that the Earth is flat, and it’s possible that you will encounter some students who give credence to this idea. Note that the observations below — along with the already-noted fact that not everyone sees the same sky at the same time — prove the flat Earth model to be wrong, but they might still not immediately convince students who think otherwise. Be gentle, and gradually help these students understand how evidence that they can see for themselves disproves the flat Earth model. (Note: proving that Earth isn’t flat does not automatically make it round; as we’ll discuss in later and in Chapter 3, proof that Earth is round comes from the fact that the sky at a given moment changes both north-south and east-west (i.e., time zones) and from Earth’s curved shadow on the Moon during lunar eclipses. Plus, of course, pictures of Earth from space!)
The Local Sky
Today, we know there is much more to the sky than we see locally, but it is still useful to be able to describe the locations and motions of objects in the local sky. Because the local sky looks like a dome, this means we can use a sky dome model for local purposes, even though we know it does not reflect reality overall. In other words, your local sky — meaning the sky as it looks from wherever you happen to be — appears to have the shape of a dome.
Figure 2.3 shows how we represent the local sky. Notice that we define three key “landmarks” in the local sky:
- The horizon defines what appears to our eyes to be the boundary between Earth and sky. We can mark the horizon with compass directions. Notice that if you face south, then west is to your right, east is to your left, and north is behind you. We define other directions as combinations of the four basic directions. For example, a direction pointing halfway between due south and due east is called southeast (SE).
- The zenith is point directly over your head.
- The meridian is an imaginary half circle stretching from the horizon due south, through the zenith, to the horizon due north.
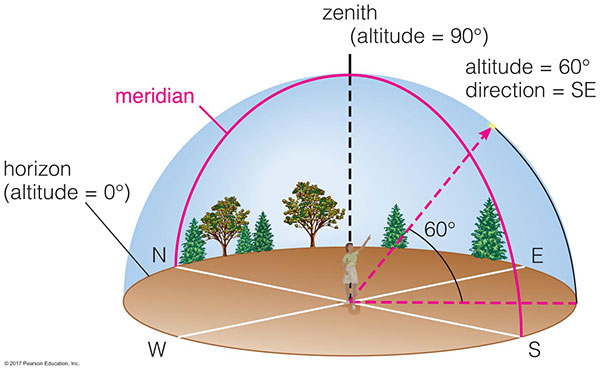
At any given moment, we can pinpoint the position of an object in the local sky by stating its direction along the horizon and its altitude above the horizon. We measure altitude in degrees, and it can range from 0° on the horizon to 90° at the zenith. Note that the zenith does not have a direction associated with it, because it is always straight up.
A Brief Review
Angle Measures
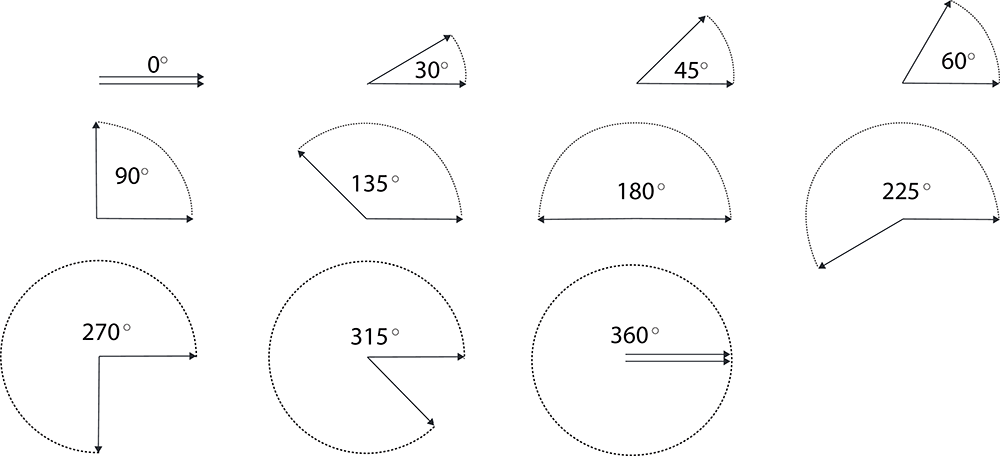
You have almost certainly learned how to measure angles before. Recall that a full circle defines an angle of 360°, and we measure other angles by how much of a circle they would encompass (or “subtend”). The illustrations below show various angles made by two lines that meet at a point called the vertex:
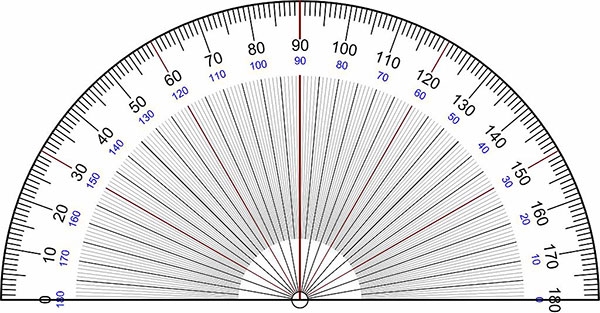
You have also probably measured angles with a protractor, like the one shown below. Recall that you simply place the central circle on the vertex, with one side of the protractor on one of the two lines, then measure where the other line meets the protractor measurements. The same basic idea applies to measuring angles in the sky, except you’ll need a different type of device to measure the angle.
For practice, draw your own set of 5 different angles, then use a protractor to measure each of them. Have another student or your teacher check your work.
Teacher Notes: Basic angle measurement is generally covered in elementary school; for example, it is part of the Common Core math standards for 4th grade. Hence, this box should be review. Nevertheless, it’s important that students understand angles, so be sure you review angle measures and the use of a protractor. Note that the box asks students to draw and measure 5 of their own angles, which is a good way to check if they understand the concept.
Class Activity
Simon Says Point to the Sky!
Your teacher will lead you in a game of Simon Says, asking you to point to particular directions and altitudes. You can do this activity inside or outside.
- To start: Use a compass to identify the directions north, south, east, and west.
- All students should face due south, with the teacher in front of them.
- The teacher will call out a direction and altitude; for example, “Simon says point to 45° east.” Each student should then turn to face the correct direction and point to the correct altitude.
- You are out if you either point in the wrong place or move when the teacher did not say “Simon says.”
Teacher Notes: The suggested Simon Says game is simply a way to make sure students understand altitude and direction. Note that you can use a shorthand like “45° east” to mean an altitude of 45° and a direction of due east. To check understanding of the terms horizon and zenith, you can say, e.g., “point to the zenith” or “point to the horizon southeast.”
Quick Quiz
Note: As always, after you finish the quiz, be sure you read the feedback that explains the correct answers, to make sure you understand the reasons for these answers.
Constellations
On a clear night at a dark site (far from city lights), you can see thousands of individual stars in the night sky, along with the whitish band of light that we call the Milky Way. Your mind will likely try to group the stars into patterns that look like familiar shapes or objects, much as we tend to do with clouds in the daytime. But unlike the ever-changing clouds, you will recognize the same patterns of stars over and over again, because these patterns have not changed noticeably in the past few thousand years.
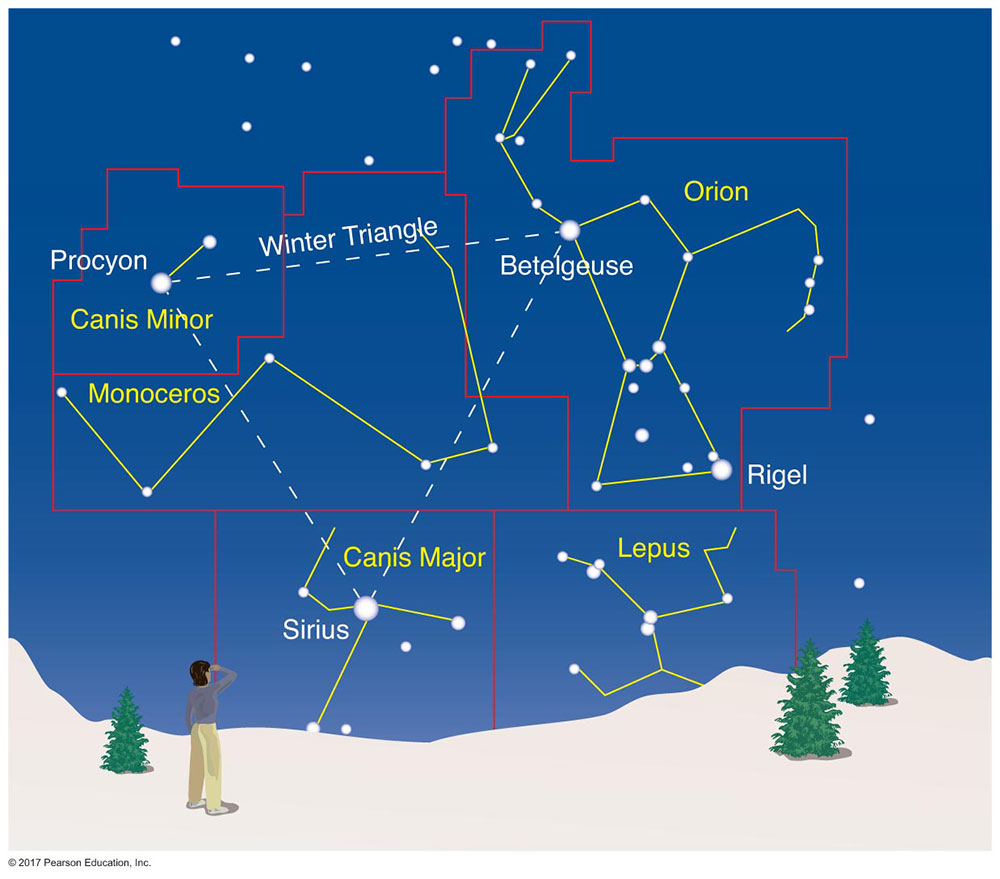
Our ancestors did the same thing, and people of nearly every culture gave names to patterns they saw in the sky. We usually refer to such patterns as constellations, though technically a constellation is a region that surrounds some identifiable star pattern. Just as every spot of land in the continental United States is part of some state, every point in the sky belongs to some constellation. Figure 2.4 shows the borders of the constellation Orion and several of its neighbors.
Connections—History
Constellation Names
Nearly every culture gave its own names to the patterns that they saw in the sky, and it can be fascinating to learn how different cultures viewed the same sets of stars. For scientific purposes, however, astronomers from around the world decided that they should settle on one set of names that would be used internationally. In 1928, an organization called the International Astronomical Union (IAU) created the official names and borders of all the constellations visible in the sky. The IAU members designated a total of 88 constellations, and because most of the members at that time were from either the United States or Europe, they gave the constellations the names that were most commonly used in those places. This explains why most of the constellations visible in the Northern Hemisphere have official names that can be traced back to civilizations of the ancient Middle East (because European civilization was heavily influenced by ancient Middle Eastern civilizations), while Southern Hemisphere constellations carry names that originated with 17th-century European explorers. More specifically, if you look at star charts, you’ll notice that most of the northern constellations have names that can be traced to Greek mythology, while many of the southern constellations have names that relate to sailing ships.
The constellations provide another way of pointing out objects in the night sky. For example, if you say that you see an airplane passing through the constellation of Orion, then someone standing with you will know exactly where to look to see the airplane (assuming they know how to recognize Orion in the night sky).
It’s easy and fun to learn the major constellations. Learning to recognize only about 20 or so constellations is enough to make the night sky feel as familiar as your own neighborhood. If you want to do this, just go outside and pay attention to the constellations at night, using star charts or a sky-viewing app to learn their names and how to recognize their patterns. If you have a local Planetarium, it probably offers sessions at which you can learn the constellations.
Journal Entry
Favorite Constellations
You’ve probably heard the names of many constellations. Pick at least three “favorite” constellations, look up and learn a little about each one, and summarize what you learn by making a journal entry of at least a few sentences for each of them. Your entries should at minimum include (1) a sketch of the constellation; (2) the times of year when it is easiest to see your constellation; (3) the name of the brightest star in the constellation; (4) a little bit about the mythology behind your constellation; and (5) a little bit about how other cultures saw the same region of the sky.
For this journal entry, it’s likely that most students will choose “favorite” constellations that are from the official set of 88 constellations defined by the International Astronomical Union, but it is OK if they choose other star patterns, such as traditional cultural constellations or patterns of stars (such as the Big Dipper or Orion’s Belt) that are not officially recognized as constellations themselves. The key is that they should be thinking about something they might then recognize in the night sky. Note: If students choose a constellation that is not visible from your latitude (e.g., if mainland U.S. students choose the Southern Cross), you might encourage them to add another “favorite” that they can see at night during some times of year.
Quiz
Note: As always, after you finish the quiz, be sure you read the feedback that explains the correct answers, to make sure you understand the reasons for these answers.
Celestial Motion in The Local Sky
Here’s a simple activity that you can do any time the sky is clear:
Step 1: Go outside and pick any celestial object; for example, you can pick the Sun if it is daytime, a bright star or planet if it is nighttime, or the Moon if it is visible.
Step 2: Determine your object’s approximate location in the sky — that is, its altitude and direction.
Step 3: Wait a couple hours, then go outside and find the same object again, and again determine its altitude and direction.
No matter what celestial object you pick, you will always find that it has moved across your sky during the hours you waited. If you were to go out more often (say, once an hour), you could determine a more complete path for the object across your sky.
For example, suppose you pick the Sun. If you mark its position each hour from sunrise to sunset, you’ll find that it traces a path going from east to west across your sky, with the exact path depending on where you live (your latitude) and the time of year. In general, the Sun follows a longer, higher path in the summer and a shorter, lower path in the winter (Figure 2.5).
Teacher Notes: This “simple activity” really is simple, but because it requires at least a couple of hours of observation, it generally cannot be done during a single class period (which is why it is in-text rather than in an Activity box). You should encourage students to do it on their own, but can just briefly discuss it and keep moving through the material that follows.
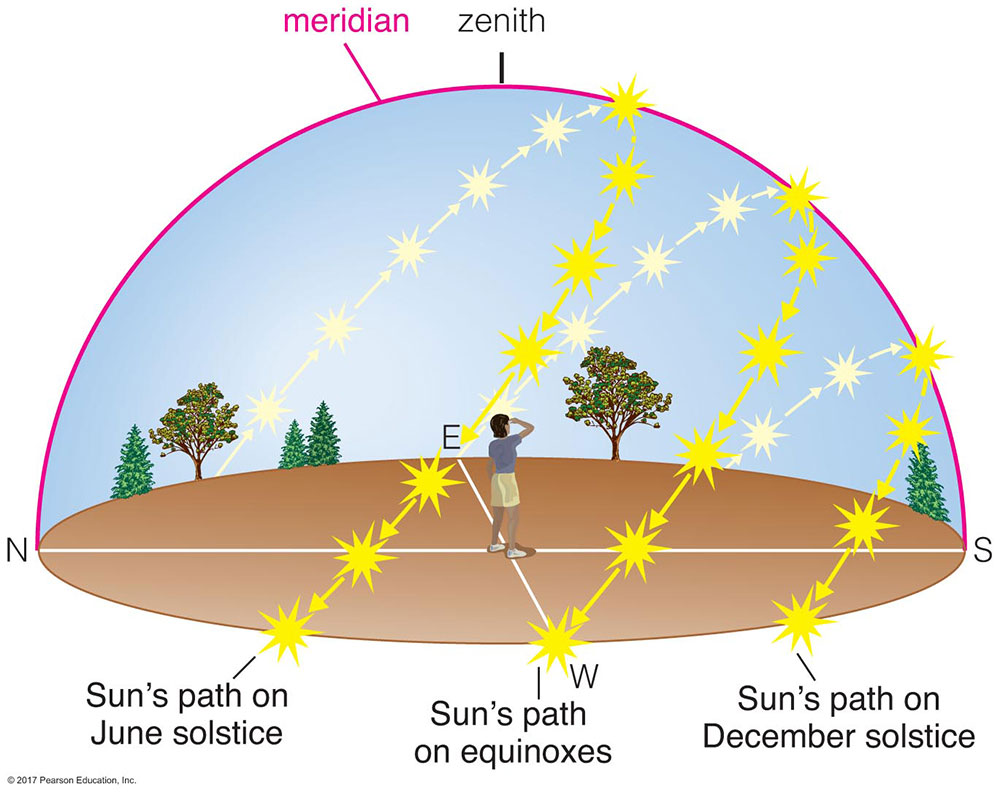
Teacher Notes: For Figure 2.5, note that we have labeled the Sun paths with the solstices and equinoxes, even though we don’t explain the meaning of those terms until the next section. We did this primarily because many students will already know the terms, and so that we can refer back to this same illustration later. But for now, students only need to know is that the Sun’s path is longer and higher in summer and shorter and lower in winter.
If you did the same thing with the stars at night, you would find that most individual stars trace daily paths that looks much like one of the Sun paths, rising in the east, crossing the meridian at their highest points, and setting in the west. However, there would be some stars toward the north (if you live in the Northern Hemisphere) or south (for the Southern Hemisphere) that would remain always above your horizon, tracing circular paths that never fall below the horizon. These stars are called circumpolar stars , and they are the ones you can see tracing full circles in Figure 2.1. These paths circle around a point that is due north in your local sky for the Northern Hemisphere or due south for the Southern Hemisphere.
In fact, as you can see in Figure 2.1, all stars are actually tracing circles in the sky, but for most locations, the daily circles of most stars are at least partly below the horizon, so that we see them rise up in the east and set in the west.
Journal Entry
Night Sky Motion
On a clear night, go outside and find at least one bright star or planet. Draw a picture that will help you remember exactly where it is located in the sky when you first look (for example, if it appears directly above some landmark as viewed from your location). Wait about two hours, then go back to the same spot outside, and find the same bright star or planet again. Add to your drawing to show the new position of your object. Label the times for the two positions that you observed.
Group Discussion
Star Trails
In small groups, discuss the following questions until you agree on answers, then check your answers with other groups from your class.
- How was the photograph of star trails in Figure 2.1 taken? What would you need to do to take your own, similar photo?
- Which stars in Figure 2.1 are circumpolar for that location? Which stars rise and set each day?
- Which direction was the camera facing in Figure 2.1? How can you tell?
- Notice that the individual star trails of circumpolar stars trace out only a portion of a full circle, even though their daily paths go in a full circle. Why doesn’t the photo show full circles? Would it be possible to take a photo in which individual star trails show a complete circle? Why or why not?
Teacher Notes: This discussion should be doable with just a few minutes, and should help to make sure students understand the motion of stars in the sky at night. Key points:
- For (1): The star trails photo is simply a long-exposure (several hours) of the night sky. Depending on how much your students know about photography, you can use this to help them understand that they’d need to set a camera with a manual shutter control on a tripod to hold it steady, and let it expose for a few hours on a clear, dark night.
- For (2): The circumpolar stars are the ones with circles entirely above the horizon. The rest have circles that fall partly below the horizon, so that they rise up in the east and set in the west each day.
- For (3): You can tell that the camera was facing due north because the camera is facing the point that the stars are circling around, which is always due north for the Northern Hemisphere.
- For (4): The star trails show only portions of full circles because the camera was exposing for only a few hours, and it would require a full day to see full circles. However, you can’t actually take such a photo, because we cannot see stars in the daytime.
Quiz
Note: As always, after you finish the quiz, be sure you read the feedback that explains the correct answers, to make sure you understand the reasons for these answers.